- Posts: 191
- Thank you received: 16
Gear Selector Switch Wiring
- alsancle
-

- Offline
- Moderator
-
Registered
Less
More
15 Feb 2021 12:58 #42254
by alsancle
I'm aiming for the 1 year anniversary of me starting the project to be finished. I've been stalling for two weeks because I need to make the wafer to organize the wires. I have about another 8 weeks to go.
Considering we have gotten about 2 feet of snow in the last 2 weeks there isn't much hurry if driving was my aim.
Replied by alsancle on topic Gear Selector Switch Wiring
feedtaleone wrote: I ordered the one piece loom from RI wiring. Looks like 8-10 weeks which reminds me I should have been moving quicker earlier in the summer. Also, I ordered the fake plug from Henry Portz.
I'm aiming for the 1 year anniversary of me starting the project to be finished. I've been stalling for two weeks because I need to make the wafer to organize the wires. I have about another 8 weeks to go.
Considering we have gotten about 2 feet of snow in the last 2 weeks there isn't much hurry if driving was my aim.
Please Log in or Create an account to join the conversation.
- feedtaleone
- Offline
- Non-Member
-
Registered
Less
More
- Posts: 1
- Thank you received: 0
15 Feb 2021 06:45 - 18 Feb 2021 14:32 #42252
by feedtaleone
Replied by feedtaleone on topic Gear Selector Switch Wiring
I ordered the one piece loom from RI wiring. Looks like 8-10 weeks which reminds me I should have been moving quicker earlier in the summer. Also, I ordered the fake plug from Henry Portz.
get-vidmate.com
instasave.onl
Last edit: 18 Feb 2021 14:32 by feedtaleone.
Please Log in or Create an account to join the conversation.
- JIM.OBRIEN
- Offline
- Premium Forum User
-
Registered
Less
More
- Posts: 586
- Thank you received: 217
06 Feb 2021 00:48 #42136
by JIM.OBRIEN
Replied by JIM.OBRIEN on topic Gear Selector Switch Wiring
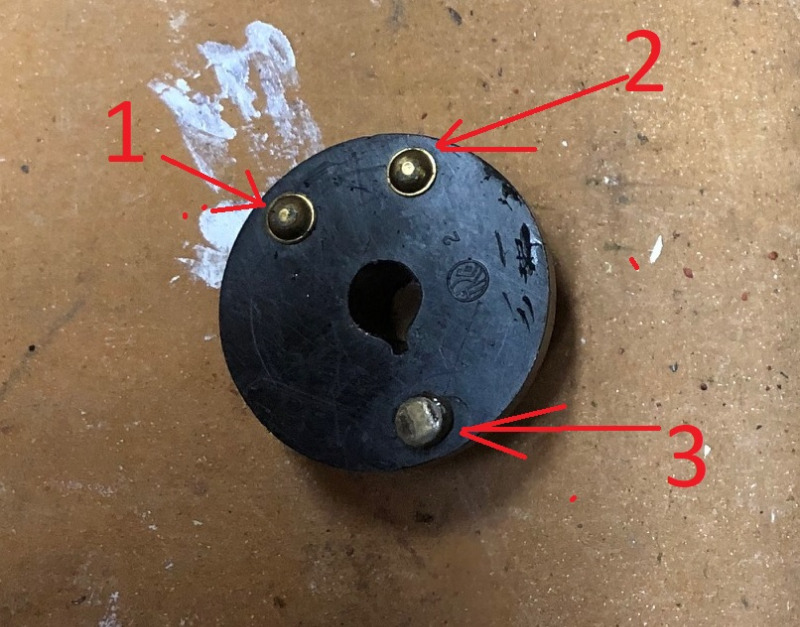
Yes, Just slide them on the pencil and then see if they all touch. THe pencil holds the wafer face and the switch face parralell. if the two are worn differently one of the buttons may not touch.
The following user(s) said Thank You: alsancle
Please Log in or Create an account to join the conversation.
- alsancle
-
- Offline
- Moderator
-
Registered
Less
More
- Posts: 191
- Thank you received: 16
05 Feb 2021 18:18 #42127
by alsancle
Jim, if I hold the wafer up to the switch the button all touch. I was messing with putting them on the pencil without using the housing and I was failing miserably at it. Do I just slide them on to the pencil as you show them in your pictures?
Replied by alsancle on topic Gear Selector Switch Wiring
JIM.OBRIEN wrote: AL, After you clean things up put the wafer and the shwitch on the pencil and gently push them together. Carefully look from the side and make sure the three buttons on the wafer are making contact with the switch face. I recently had a switch were one contact wasn't touching when the pencil was in place. It drove me nuts trying to find the problem. After I figured it out the owner told me he just changed out the wafer because it looked better then the one that was in there.
Jim, if I hold the wafer up to the switch the button all touch. I was messing with putting them on the pencil without using the housing and I was failing miserably at it. Do I just slide them on to the pencil as you show them in your pictures?
Please Log in or Create an account to join the conversation.
- JIM.OBRIEN
- Offline
- Premium Forum User
-
Registered
Less
More
- Posts: 586
- Thank you received: 217
05 Feb 2021 15:30 #42120
by JIM.OBRIEN
Replied by JIM.OBRIEN on topic Gear Selector Switch Wiring
AL, After you clean things up put the wafer and the shwitch on the pencil and gently push them together. Carefully look from the side and make sure the three buttons on the wafer are making contact with the switch face. I recently had a switch were one contact wasn't touching when the pencil was in place. It drove me nuts trying to find the problem. After I figured it out the owner told me he just changed out the wafer because it looked better then the one that was in there.
Please Log in or Create an account to join the conversation.
- alsancle
-
- Offline
- Moderator
-
Registered
Less
More
- Posts: 191
- Thank you received: 16
04 Feb 2021 10:54 #42105
by alsancle
Replied by alsancle on topic Gear Selector Switch Wiring
Thanks. I will check #3.
Please Log in or Create an account to join the conversation.
- mikespeed35
-

- Offline
- ACD Club Life Member
-
Registered
Less
More
- Posts: 886
- Thank you received: 194
04 Feb 2021 05:03 #42104
by mikespeed35
Mike Huffman
Replied by mikespeed35 on topic Gear Selector Switch Wiring
Top Shelf Club Member, Jim O'Brien.
CORDiallyMike
CORDiallyMike
Mike Huffman
Please Log in or Create an account to join the conversation.
- JIM.OBRIEN
- Offline
- Premium Forum User
-
Registered
Less
More
- Posts: 586
- Thank you received: 217
04 Feb 2021 03:19 #42102
by JIM.OBRIEN
Replied by JIM.OBRIEN on topic Gear Selector Switch Wiring
Number 3 was the one I saw earlier. But the whole face on 4 thru 8 needs a good cleaning up before you do anything. Then check the connections like I explained earlier. if you have a questions on it call me at 484-650-2124, I can walk you thru it.
The following user(s) said Thank You: alsancle
Please Log in or Create an account to join the conversation.
- uconn_1965
- Offline
- Moderator
-
Registered
Less
More
- Posts: 369
- Thank you received: 97
03 Feb 2021 13:59 #42095
by uconn_1965
Replied by uconn_1965 on topic Gear Selector Switch Wiring
My eyes are getting bad but I would say #3
The following user(s) said Thank You: alsancle
Please Log in or Create an account to join the conversation.
- alsancle
-
- Offline
- Moderator
-
Registered
Less
More
- Posts: 191
- Thank you received: 16
03 Feb 2021 13:57 #42094
by alsancle
Replied by alsancle on topic Gear Selector Switch Wiring
Jim,
You mentioned that one of the contacts looked bad. Could you look at these pictures and tell me which one you were looking at?
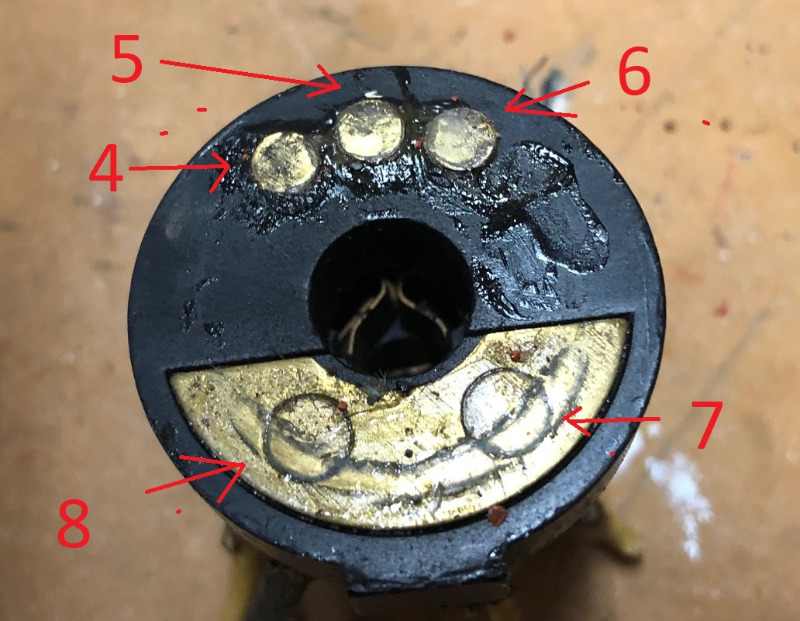
You mentioned that one of the contacts looked bad. Could you look at these pictures and tell me which one you were looking at?
Please Log in or Create an account to join the conversation.
- alsancle
-
- Offline
- Moderator
-
Registered
Less
More
- Posts: 191
- Thank you received: 16
03 Feb 2021 13:49 #42091
by alsancle
Replied by alsancle on topic Gear Selector Switch Wiring
Thanks guys. I replied in the other thread with the pictures. I just ordered some fish paper and don't see a big deal making one.
Please Log in or Create an account to join the conversation.
- uconn_1965
- Offline
- Moderator
-
Registered
Less
More
- Posts: 369
- Thank you received: 97
03 Feb 2021 02:21 #42088
by uconn_1965
Replied by uconn_1965 on topic Gear Selector Switch Wiring
I just looked at some of my spare shift parts. I don’t have an extra separator but I pulled one out of a complete spare arm that I have. I’d be happy to send it to you to copy along with the cardboard rectangular insulator that goes inside the switch. Just send me your name and mailing address and I’ll put it in the mail. I took a picture of the 2 pieces but can’t see how I attach the photo to this reply
Please Log in or Create an account to join the conversation.
- Mike Brady
- Offline
- Moderator
-
Registered
Less
More
- Posts: 36
- Thank you received: 9
03 Feb 2021 02:14 #42087
by Mike Brady
Replied by Mike Brady on topic Gear Selector Switch Wiring
AJ
The diagram on page 4 (May 12th) shows the wire separator. I made mine out of fish paper and punched the holes with a leather punch. I also inserted a roll of fish paper between the switch and the casting.....just in case.
The diagram on page 4 (May 12th) shows the wire separator. I made mine out of fish paper and punched the holes with a leather punch. I also inserted a roll of fish paper between the switch and the casting.....just in case.
The following user(s) said Thank You: alsancle
Please Log in or Create an account to join the conversation.
- uconn_1965
- Offline
- Moderator
-
Registered
Less
More
- Posts: 369
- Thank you received: 97
03 Feb 2021 01:49 #42086
by uconn_1965
Replied by uconn_1965 on topic Gear Selector Switch Wiring
If I had one, I would just give it to you. From my recollection, the circle is about the diameter of the back of the housing. There is a center hole large enough for the shift pencil to slide thru without touching. Then they are 10 holes for the wires but there is a special placement of holes on the disk. The purpose of this spacer is to prevent the sliding of the pencil in and out from chafing the wires.
Please Log in or Create an account to join the conversation.
- uconn_1965
- Offline
- Moderator
-
Registered
Less
More
- Posts: 369
- Thank you received: 97
03 Feb 2021 01:42 #42085
by uconn_1965
Replied by uconn_1965 on topic Gear Selector Switch Wiring
Pete: you are correct. Over the years I’ve had a couple of those nos switches and wires. The only problem I had with them was identifying the color of the wires because they had faded and had to trace them back to the switch. I always had to pull column to solder and install the firewall connection
Please Log in or Create an account to join the conversation.
- alsancle
-
- Offline
- Moderator
-
Registered
Less
More
- Posts: 191
- Thank you received: 16
03 Feb 2021 01:31 #42084
by alsancle
Replied by alsancle on topic Gear Selector Switch Wiring
Pete, that is a nice piece. Looks identical to the one I have. Except a lot nicer.
Please Log in or Create an account to join the conversation.
- alsancle
-
- Offline
- Moderator
-
Registered
Less
More
- Posts: 191
- Thank you received: 16
03 Feb 2021 01:28 #42083
by alsancle
So I didn't have a separator when we took ours apart. Is it critical, and if so anyone know where I can find one? If not, maybe a picture and I'll make one?
thanks.
Replied by alsancle on topic Gear Selector Switch Wiring
uconn_1965 wrote: Jim: you are 100% correct. One thing I might add is before you start to soldier any wires, make sure you feed the 10 wires thru that round cardboard separator at rear of switch the keeps the wires separated from the shift pencil moving in and out when selecting gears.
So I didn't have a separator when we took ours apart. Is it critical, and if so anyone know where I can find one? If not, maybe a picture and I'll make one?
thanks.
Please Log in or Create an account to join the conversation.
- pete kelly
-

- Offline
- Moderator
-
Registered
Less
More
- Posts: 492
- Thank you received: 118
03 Feb 2021 01:27 #42082
by pete kelly
Replied by pete kelly on topic Gear Selector Switch Wiring
Evening all
Here are pics of the selector switch as I got it.
Looks like a factory replacement part, still NOS.
Pete
Here are pics of the selector switch as I got it.
Looks like a factory replacement part, still NOS.
Pete
Please Log in or Create an account to join the conversation.
- JIM.OBRIEN
- Offline
- Premium Forum User
-
Registered
Less
More
- Posts: 586
- Thank you received: 217
03 Feb 2021 01:19 #42081
by JIM.OBRIEN
Replied by JIM.OBRIEN on topic Gear Selector Switch Wiring
Gary, that is instructions for a replacement switch Stan sells. AN original switch is very different.
Please Log in or Create an account to join the conversation.
- 1748 S
- Offline
- Platinum Forum User
-
Registered
Less
More
- Posts: 1749
- Thank you received: 134
02 Feb 2021 23:26 #42080
by 1748 S
Replied by 1748 S on topic Gear Selector Switch Wiring
This information came from Stan I believe.It appears to be an after market switch so I'm not sure our orignial switch comes apart like this. He sells this information thru his catalog. I see many information sheets in there costing $3.00 each and up.
Gary Parsons
Gary Parsons
Please Log in or Create an account to join the conversation.
- uconn_1965
- Offline
- Moderator
-
Registered
Less
More
- Posts: 369
- Thank you received: 97
02 Feb 2021 21:24 #42079
by uconn_1965
Replied by uconn_1965 on topic Gear Selector Switch Wiring
Jim: you are 100% correct. One thing I might add is before you start to soldier any wires, make sure you feed the 10 wires thru that round cardboard separator at rear of switch the keeps the wires separated from the shift pencil moving in and out when selecting gears.
The following user(s) said Thank You: 1748 S
Please Log in or Create an account to join the conversation.
- JIM.OBRIEN
- Offline
- Premium Forum User
-
Registered
Less
More
- Posts: 586
- Thank you received: 217
02 Feb 2021 20:32 #42078
by JIM.OBRIEN
Replied by JIM.OBRIEN on topic Gear Selector Switch Wiring
Pete - It's my understanding the steering column came in pre-wired. All the factory had to do we drop the column in place, bolt it up to the dash and plug in the connector at the firewall. I don't thing they every thought we would be rewiring them 85 years later.
Al - Don't worry about screwing it up, it's really tought to screw it up to the point of no return. Before you attach the wires take a good look at the contacts inside the switch and make sure they are not worn out. I have seen several that have holes worn in the contacts down inside the switch.
I see one of the contacts on the wafer is worn. Put the wafer on the pencil and put the pencil in the switch and make sure all three contacts on the wafer are hitting the face of the switch. I had one recently where one didn't make contact and it drove me crazy trying to find the problem (it didn't help the owner was sitting there watching).
When you solder the wires on start with the longest (the 4 wires that go to the face) wires first and work your way to the back triming the wires as you go so they lay in there neatly. Use enough solder to secure the wires on the terminal, but no a big glob. THen follow the testing I documented in the artilce. It may seam excessive but if you follow it you will catch any problems early and when you are done you know the switch is working properly and not giving you any problems.
JIm
The following user(s) said Thank You: alsancle
Please Log in or Create an account to join the conversation.
- 1748 S
- Offline
- Platinum Forum User
-
Registered
Less
More
- Posts: 1749
- Thank you received: 134
01 Feb 2021 23:41 #42077
by 1748 S
Replied by 1748 S on topic Gear Selector Switch Wiring
I recall seeing a print made by Henry Portz once. In the second to last pic those brass pieces that fit thru the switch get pushed out. Then the wire is soldered into them. then they are pulled back into the switch. This print could have been from Stan or JK Howell too. I think I have it in my photo album. Will check later.
Gary Parsons
Gary Parsons
Please Log in or Create an account to join the conversation.
- alsancle
-
- Offline
- Moderator
-
Registered
Less
More
- Posts: 191
- Thank you received: 16
01 Feb 2021 23:36 #42076
by alsancle
Replied by alsancle on topic Gear Selector Switch Wiring
Post some pictures Pete! The wires attached is cool if you are using the plug at the bottom of the column. I have no idea how you are supposed to get down there and solder with a supercharged car, however.
I'm really trying to come up with a way to disconnect the switch at the column. But I only get one shot with the harness I have and screwing it up would be catastrophic.
I'm really trying to come up with a way to disconnect the switch at the column. But I only get one shot with the harness I have and screwing it up would be catastrophic.
Please Log in or Create an account to join the conversation.
- pete kelly
-
- Offline
- Moderator
-
Registered
Less
More
- Posts: 492
- Thank you received: 118
01 Feb 2021 23:21 #42075
by pete kelly
Replied by pete kelly on topic Gear Selector Switch Wiring
I was interested in the procedure for pulling in new wires.
I found it strange that my NOS selector switch comes with the wires attached.
Any ideas how the factory suggested it be done?
Pete
I found it strange that my NOS selector switch comes with the wires attached.
Any ideas how the factory suggested it be done?
Pete
Please Log in or Create an account to join the conversation.
- alsancle
-
- Offline
- Moderator
-
Registered
Less
More
- Posts: 191
- Thank you received: 16
01 Feb 2021 22:30 #42072
by alsancle
Replied by alsancle on topic Gear Selector Switch Wiring
My buddy the Electrical engineer cleaned up our original selection switch. Here is the before and after.
Please Log in or Create an account to join the conversation.
- alsancle
-
- Offline
- Moderator
-
Registered
Less
More
- Posts: 191
- Thank you received: 16
01 Feb 2021 22:20 #42070
by alsancle
Replied by alsancle on topic Gear Selector Switch Wiring
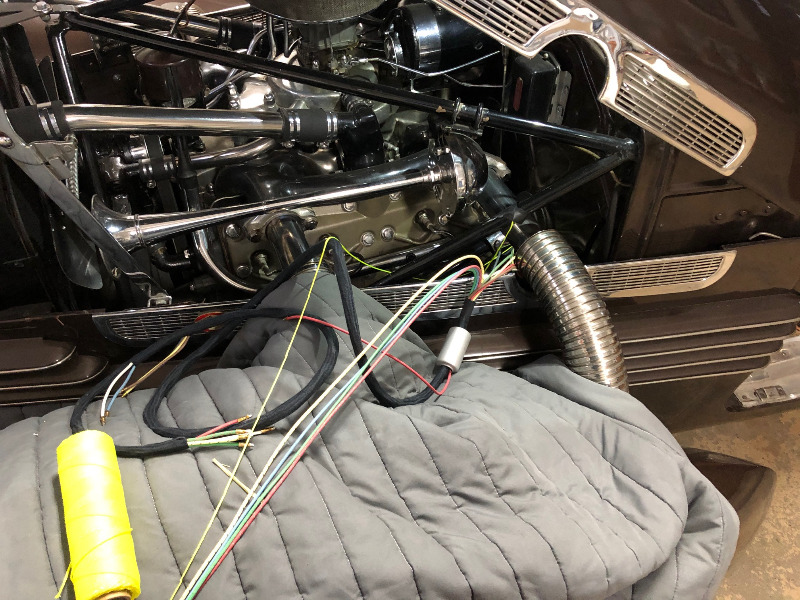
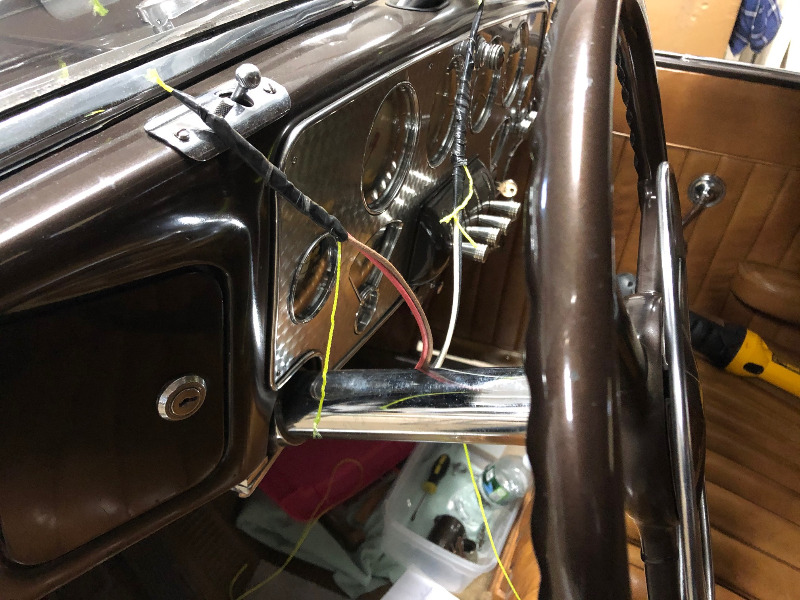
My brother and I got the 10 wires pulled up from the bottom of the steering column using Jim's instructions. We had to use pull lube on the last two pulls. Each pull is two wires and another pull string. You can get pull lube at Home depot. With two guys we did the 10 wires in about 2 hours total. It takes longer than you would think.
You need tiny but strong pull string. And you need to tape in a way that doesn't bulk up the package.
Hopefully Friday we solder.
You need tiny but strong pull string. And you need to tape in a way that doesn't bulk up the package.
Hopefully Friday we solder.
Please Log in or Create an account to join the conversation.
- Terry Cockerell
-
 Topic Author
- Offline
- Elite Forum User
-
Registered
Less
More
- Posts: 1339
- Thank you received: 303
30 Jan 2021 20:26 #42063
by Terry Cockerell
T cockerell
Replied by Terry Cockerell on topic Gear Selector Switch Wiring
Go back to page 5 of this Forum. I used the one piece wiring loom and explained how I did the whole job. You can only feed the wires up from the lower end of the steering column cover tube.
You have a very nice looking phaeton.
You have a very nice looking phaeton.
T cockerell
The following user(s) said Thank You: alsancle
Please Log in or Create an account to join the conversation.
- alsancle
-
- Offline
- Moderator
-
Registered
Less
More
- Posts: 191
- Thank you received: 16
30 Jan 2021 13:31 - 30 Jan 2021 13:31 #42062
by alsancle
Replied by alsancle on topic Gear Selector Switch Wiring
Hey Terry,
Because I eliminated the plug I have the one piece harness. I'm not sure I could pull the entire thing down from the top?
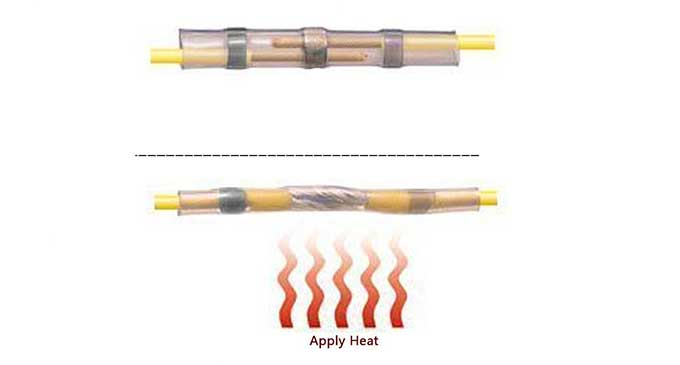
I do agree it would be much nicer to do the solder work on a bench. I've been evaluating the notion of soldering very small portions of wire to the switch on the bench and then using solder seals to do the connections. The solder seals just get heated with a heat gun. The issue is clearance as the seals are slightly larger in diameter than the wire.
Because I eliminated the plug I have the one piece harness. I'm not sure I could pull the entire thing down from the top?
I do agree it would be much nicer to do the solder work on a bench. I've been evaluating the notion of soldering very small portions of wire to the switch on the bench and then using solder seals to do the connections. The solder seals just get heated with a heat gun. The issue is clearance as the seals are slightly larger in diameter than the wire.
Last edit: 30 Jan 2021 13:31 by alsancle.
Please Log in or Create an account to join the conversation.
- Terry Cockerell
-
Topic Author
- Offline
- Elite Forum User
-
Registered
Less
More
- Posts: 1339
- Thank you received: 303
30 Jan 2021 06:54 #42060
by Terry Cockerell
T cockerell
Replied by Terry Cockerell on topic Gear Selector Switch Wiring
From my experience the simplest way to do the job is to remove the steering wheel then remove the column tube. The soldering job is much easier on a bench with everything laid out. When completed the column tube complete with wiring can be slid down over the steering column. The firewall side steering column grommet has to be cut for refitting and can simply be super glued on the cut. It may take a bit longer but is can all be done by one person.
T cockerell
Please Log in or Create an account to join the conversation.
- alsancle
-
- Offline
- Moderator
-
Registered
Less
More
- Posts: 191
- Thank you received: 16
29 Jan 2021 23:21 #42051
by alsancle
Replied by alsancle on topic Gear Selector Switch Wiring
So I gave our original switch to an electrical engineer buddy of mine that is plenty of solder experience to clean it up. Hopefully when he is ready I'll have the harness pulled. Today my brother and I spent about 90 minutes and got 6 of the 10 wires pulled. We are following Jim's instructions exactly as he outlined in his newsletter article from last month. My only comment would be that Jim says it is easier with 2 people and I would say it would be impossible without 2.
Please Log in or Create an account to join the conversation.
- alsancle
-
- Offline
- Moderator
-
Registered
Less
More
- Posts: 191
- Thank you received: 16
06 Dec 2020 14:08 - 06 Dec 2020 14:18 #41711
by alsancle
Replied by alsancle on topic Gear Selector Switch Wiring
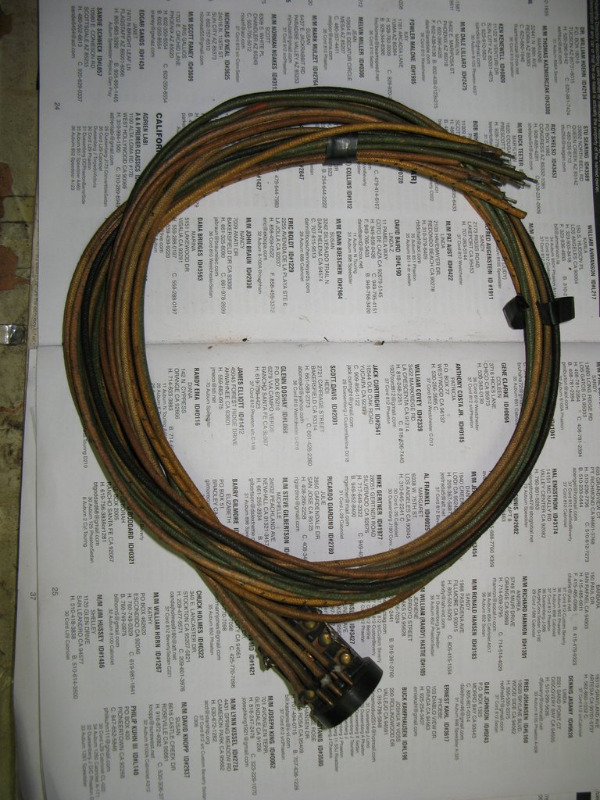
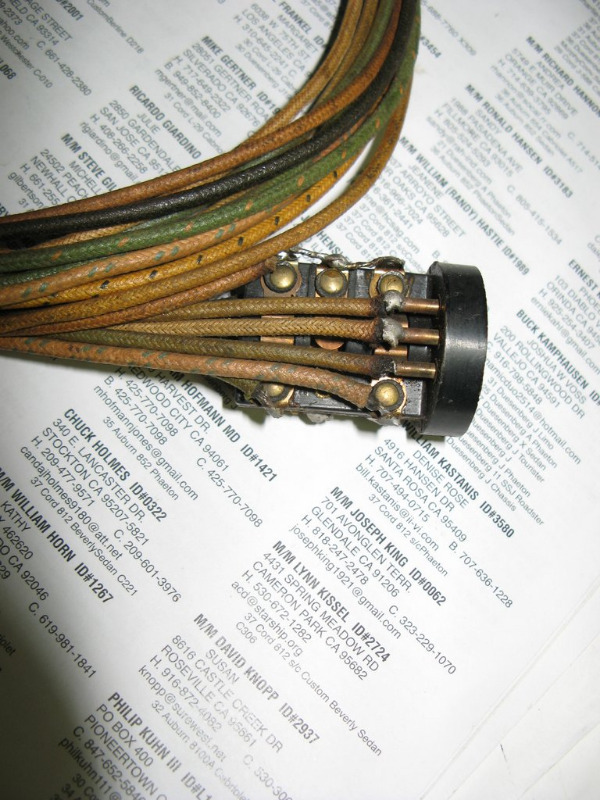
So our new harness from RI Wiring arrived on Friday. It took about 7 weeks because per recommendation we wanted to eliminate the plug at the bottom of the firewall. This is a special order with RI Wiring instead of the split harness they keep in stock. Will be pulling it through a fake plug. At first I looked at the box and thought "that all?". But when I unwound it, the length is probably 8 feet or more which must be enough to get from the interlock switch to the top of the column. Here are some pictures.
Last edit: 06 Dec 2020 14:18 by alsancle.
Please Log in or Create an account to join the conversation.
- 1748 S
- Offline
- Platinum Forum User
-
Registered
Less
More
- Posts: 1749
- Thank you received: 134
03 Nov 2020 15:57 #41403
by 1748 S
Replied by 1748 S on topic Gear Selector Switch Wiring
Thanks for posting the new and original pictures. The originals look impossible to get out but with CORDS NOTHING is impossible... We all have found this out many times..
Gary Parsons
Gary Parsons
Please Log in or Create an account to join the conversation.
- alsancle
-
- Offline
- Moderator
-
Registered
Less
More
- Posts: 191
- Thank you received: 16
03 Nov 2020 01:51 #41389
by alsancle
Replied by alsancle on topic Gear Selector Switch Wiring
Here is a picture of the original ring and the redesigned one that is sold by Auburn Cord Parts.
Please Log in or Create an account to join the conversation.
- JIM.OBRIEN
- Offline
- Premium Forum User
-
Registered
Less
More
- Posts: 586
- Thank you received: 217
22 Oct 2020 22:30 #41252
by JIM.OBRIEN
Replied by JIM.OBRIEN on topic Gear Selector Switch Wiring
Terry,
From photos I remember you posting previously your switch is a "new" design. Also the ring with the loop on it is a newer design. As far as I know all the original rings were were just that...a ring.
From photos I remember you posting previously your switch is a "new" design. Also the ring with the loop on it is a newer design. As far as I know all the original rings were were just that...a ring.
Please Log in or Create an account to join the conversation.
- George van Nostrand
- Offline
- Moderator
-
Registered
Less
More
- Posts: 113
- Thank you received: 35
22 Oct 2020 15:18 #41247
by George van Nostrand
Restoring 1936 Cord Westchester sedan.2023 A
Replied by George van Nostrand on topic Gear Selector Switch Wiring
Stan at Auburn Cord Parts shows : # 6015 ( B-6015 ) Selector switch snap ring retainer. New design.
Restoring 1936 Cord Westchester sedan.2023 A
Please Log in or Create an account to join the conversation.
- Terry Cockerell
-
Topic Author
- Offline
- Elite Forum User
-
Registered
Less
More
- Posts: 1339
- Thank you received: 303
21 Oct 2020 20:06 #41238
by Terry Cockerell
T cockerell
Replied by Terry Cockerell on topic Gear Selector Switch Wiring
The wire circlip or snap ring holding my switch has a small loop on one end which made it much easier to get hold of and remove.
It may have been an updated design with the new plastic body switch.
Sorry I don't have a picture of it.
It may have been an updated design with the new plastic body switch.
Sorry I don't have a picture of it.
T cockerell
Please Log in or Create an account to join the conversation.
- alsancle
-
- Offline
- Moderator
-
Registered
Less
More
- Posts: 191
- Thank you received: 16
21 Oct 2020 12:22 #41232
by alsancle
Replied by alsancle on topic Gear Selector Switch Wiring
Thanks Guys. Jim - sent you a private message with my email. Also, I believe Mike Brady told me that I can get snap rings from Stan Gillialand? I'll look for my roster today and find his contact info. No way I'm putting that round ring back in there. I almost took a hack saw to the housing I was so annoyed with it.
Still waiting for RI wiring to ship the new full length harness.
Still waiting for RI wiring to ship the new full length harness.
Please Log in or Create an account to join the conversation.
- 1748 S
- Offline
- Platinum Forum User
-
Registered
Less
More
- Posts: 1749
- Thank you received: 134
20 Oct 2020 21:20 #41227
by 1748 S
Replied by 1748 S on topic Gear Selector Switch Wiring
Glad you got it apart. Nothing looks bad but do as Jim suggested. I hope you can replace the difficult to remove snap ring. No better time than now. No telling how many times you may have to open this switch again.Hopefully you never have too.
Gary Parsons
Gary Parsons
The following user(s) said Thank You: alsancle
Please Log in or Create an account to join the conversation.
- JIM.OBRIEN
- Offline
- Premium Forum User
-
Registered
Less
More
- Posts: 586
- Thank you received: 217
20 Oct 2020 21:14 #41226
by JIM.OBRIEN
Replied by JIM.OBRIEN on topic Gear Selector Switch Wiring
Hi Al, From the photos the switch looks good. Clean all the grease off of it, unsolder the wires and inspect it closely. Check the contacts, I have seen some with holes worn in them from all the shifting. I am just finishing up my next article on putting this switch back together and testing it. If you send me your email I will forward you a copy so you can see if I missed anything and hopefully give you some tips to get it back together..
Jim
Jim
The following user(s) said Thank You: alsancle
Please Log in or Create an account to join the conversation.
- alsancle
-
- Offline
- Moderator
-
Registered
Less
More
- Posts: 191
- Thank you received: 16
20 Oct 2020 20:02 #41224
by alsancle
Replied by alsancle on topic Gear Selector Switch Wiring
Well, that was quite a pain in the rear end but I have my switch out. I could only get the snap ring to move 20 degrees either way and could not get the opening over to the slot. I finally gave up and gave it to my buddy Mike Lavalle of KES who is more skilled and has better tools. It took him about an hour. The switch was wrapped in electrical tape which he carefully pulled out which allowed him more clearance to rotate the ring.
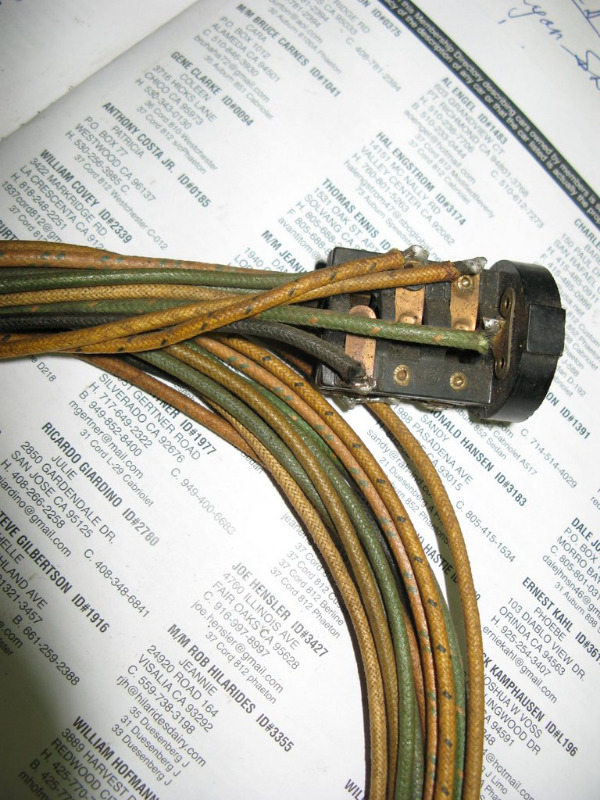
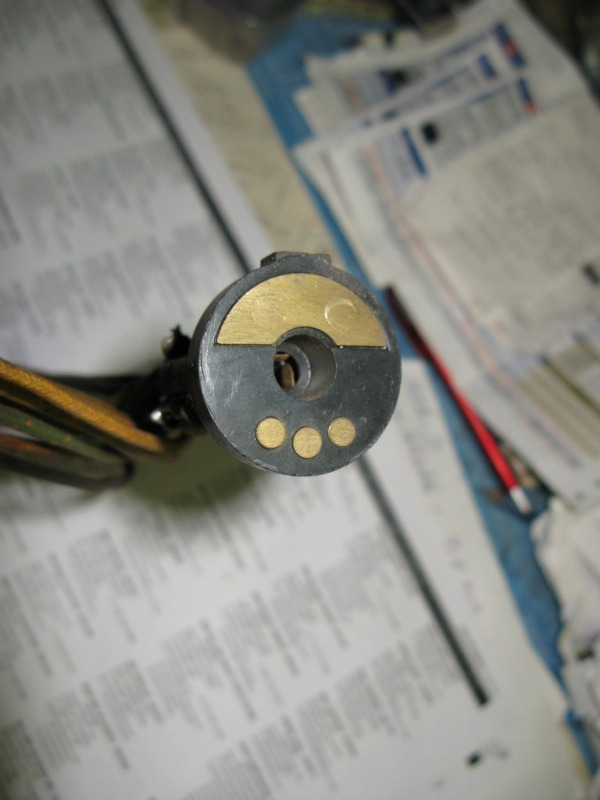
Examining my switch (see pictures) I see no cracks or breaks just horrible solder work. There is grease on the end contacts and I'm not sure if they was causing issues. I have a new replacement switch but may reuse this one. Thoughts?
Examining my switch (see pictures) I see no cracks or breaks just horrible solder work. There is grease on the end contacts and I'm not sure if they was causing issues. I have a new replacement switch but may reuse this one. Thoughts?
Please Log in or Create an account to join the conversation.
- JIM.OBRIEN
- Offline
- Premium Forum User
-
Registered
Less
More
- Posts: 586
- Thank you received: 217
20 Sep 2020 23:45 #41019
by JIM.OBRIEN
Replied by JIM.OBRIEN on topic Gear Selector Switch Wiring
I usually feed two at a time and pull another string in at the same time. Also have a spare string in there on the side just incase the string slips off the wires as you are pulling them.
The following user(s) said Thank You: 1748 S
Please Log in or Create an account to join the conversation.
- alsancle
-
- Offline
- Moderator
-
Registered
Less
More
- Posts: 191
- Thank you received: 16
20 Sep 2020 13:37 #41009
by alsancle
Replied by alsancle on topic Gear Selector Switch Wiring
Thanks Jim. Feed them one at a time from the bottom?
Please Log in or Create an account to join the conversation.
- JIM.OBRIEN
- Offline
- Premium Forum User
-
Registered
Less
More
- Posts: 586
- Thank you received: 217
20 Sep 2020 01:04 #41002
by JIM.OBRIEN
Replied by JIM.OBRIEN on topic Gear Selector Switch Wiring
AL, You can replace the shift wiring harness with the steering column in the car. I have done two recently. It take a little more work (but not as much as removing the steering column). It helps if you have a second set of hands to help out with feeding the wires thru the column and when soldering the switch. You will have to solder the switch while you are sitting in the car.
The following user(s) said Thank You: 1748 S
Please Log in or Create an account to join the conversation.
- 1748 S
- Offline
- Platinum Forum User
-
Registered
Less
More
- Posts: 1749
- Thank you received: 134
19 Sep 2020 00:12 #40987
by 1748 S
Thanks for the information. I'm located about 3 hours south of this. I really want to walk thru the Henry shop just to see what he was doing and look at the tooling. Maybe purchase something I "can't do without"... Tell the wife I just need one more part....
Gary Parsons
Replied by 1748 S on topic Gear Selector Switch Wiring
Rileypu29 wrote: I just purchased two water pump rebuild kits from Cathy Portz who is indeed still selling Henry's parts. There is a website for ordering. Cathy is great to work with and shipped the parts very quickly. I highly recommend buying parts from her.
Bill Kastanis
Thanks for the information. I'm located about 3 hours south of this. I really want to walk thru the Henry shop just to see what he was doing and look at the tooling. Maybe purchase something I "can't do without"... Tell the wife I just need one more part....
Gary Parsons
Please Log in or Create an account to join the conversation.
- Rileypu29
-

- Offline
- Senior Forum User
-
Registered
Less
More
- Posts: 82
- Thank you received: 14
18 Sep 2020 17:07 #40981
by Rileypu29
Bill Kastanis
Replied by Rileypu29 on topic Gear Selector Switch Wiring
I just purchased two water pump rebuild kits from Cathy Portz who is indeed still selling Henry's parts. There is a website for ordering. Cathy is great to work with and shipped the parts very quickly. I highly recommend buying parts from her.
Bill Kastanis
Bill Kastanis
Bill Kastanis
Please Log in or Create an account to join the conversation.
- alsancle
-
- Offline
- Moderator
-
Registered
Less
More
- Posts: 191
- Thank you received: 16
18 Sep 2020 14:05 #40979
by alsancle
Replied by alsancle on topic Gear Selector Switch Wiring
I believe his daughter is selling off his inventory via his website, but since I don't have it in my hands yet, we shall see.
Please Log in or Create an account to join the conversation.
- 1748 S
- Offline
- Platinum Forum User
-
Registered
Less
More
- Posts: 1749
- Thank you received: 134
18 Sep 2020 13:53 #40978
by 1748 S
Replied by 1748 S on topic Gear Selector Switch Wiring
How can you have purchased something from Henry Portz? I suspect you purchased the fake plug several years ago. But VERY interested in your response too.
Gary Parsons
Gary Parsons
Please Log in or Create an account to join the conversation.
- alsancle
-
- Offline
- Moderator
-
Registered
Less
More
- Posts: 191
- Thank you received: 16
18 Sep 2020 12:20 #40977
by alsancle
Replied by alsancle on topic Gear Selector Switch Wiring
I ordered the one piece loom from RI wiring. Looks like 8-10 weeks which reminds me I should have been moving quicker earlier in the summer. Also, I ordered the fake plug from Henry Portz.
I told my dad we are taking the steering tube out and he was disagreeing since he didn't have to do it last time, and I pointed out that last time he didn't replace the harness.
I told my dad we are taking the steering tube out and he was disagreeing since he didn't have to do it last time, and I pointed out that last time he didn't replace the harness.
Please Log in or Create an account to join the conversation.
- JIM.OBRIEN
- Offline
- Premium Forum User
-
Registered
Less
More
- Posts: 586
- Thank you received: 217
14 Sep 2020 14:49 #40959
by JIM.OBRIEN
Replied by JIM.OBRIEN on topic Gear Selector Switch Wiring
Terry is correct you have to feed the wires from the bottom of the steering column. You want to sort them out first so when they come out on top they feed directly into the shift arm housing and the switch. I'll post the order of the wires later, all my notes are in the shop.
Originally there was a cardboard "washer" the wires ran thru that was located at the base of the shift arm (at the steering column). Your best bet is to pull in two or three wires at a time. I always use a string to pull in the wires and ALWAYS have a spare pull string in the column.
Originally there was a cardboard "washer" the wires ran thru that was located at the base of the shift arm (at the steering column). Your best bet is to pull in two or three wires at a time. I always use a string to pull in the wires and ALWAYS have a spare pull string in the column.
The following user(s) said Thank You: alsancle
Please Log in or Create an account to join the conversation.