- Posts: 119
- Thank you received: 10
Cord 812 Custom Beverly restoration story
- RubyDS
-
 Topic Author
- Offline
- Moderator
-
Registered
Less
More
28 Jun 2020 21:46 - 28 Jun 2020 21:52 #40439
by RubyDS
Replied by RubyDS on topic Cord 812 Custom Beverly restoration story
Last edit: 28 Jun 2020 21:52 by RubyDS.
Please Log in or Create an account to join the conversation.
- RubyDS
-
Topic Author
- Offline
- Moderator
-
Registered
Less
More
- Posts: 119
- Thank you received: 10
28 Jun 2020 18:06 #40437
by RubyDS
Replied by RubyDS on topic Cord 812 Custom Beverly restoration story
Please Log in or Create an account to join the conversation.
- RubyDS
-
Topic Author
- Offline
- Moderator
-
Registered
Less
More
- Posts: 119
- Thank you received: 10
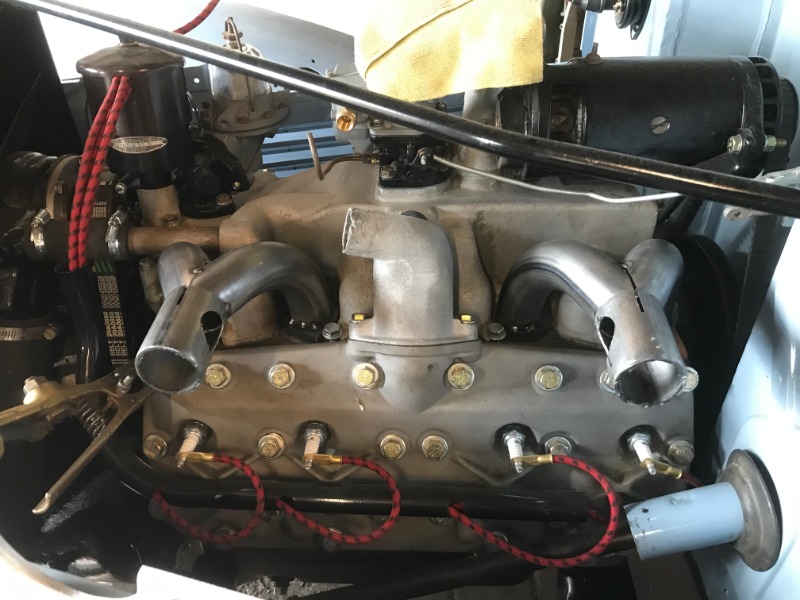
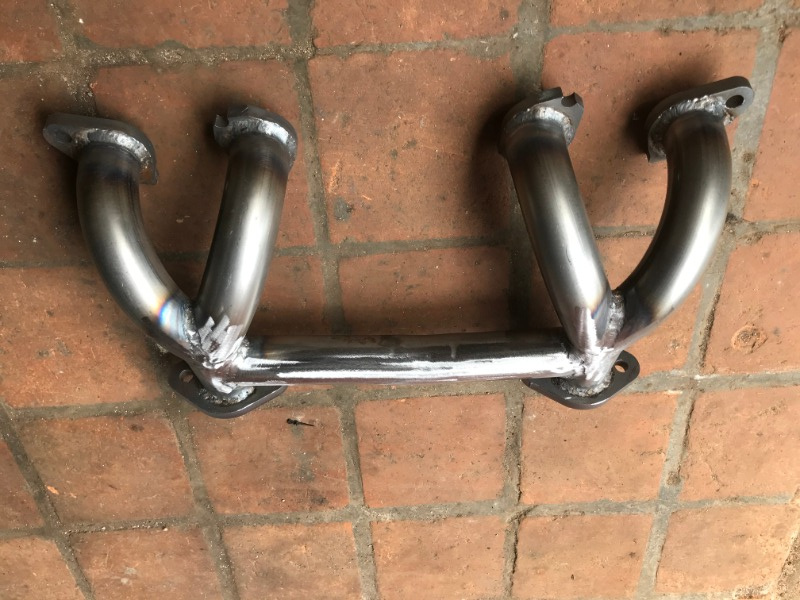
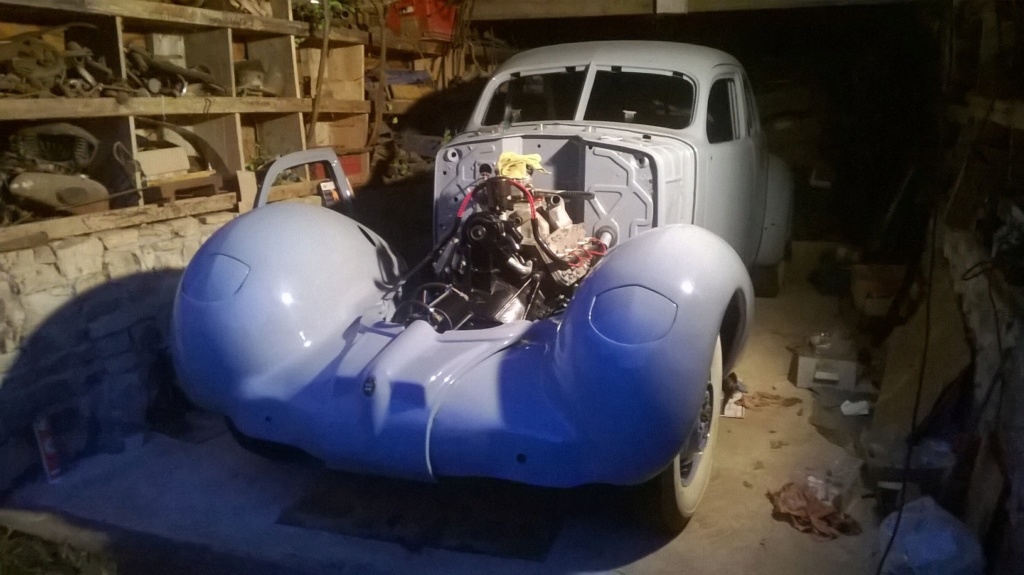
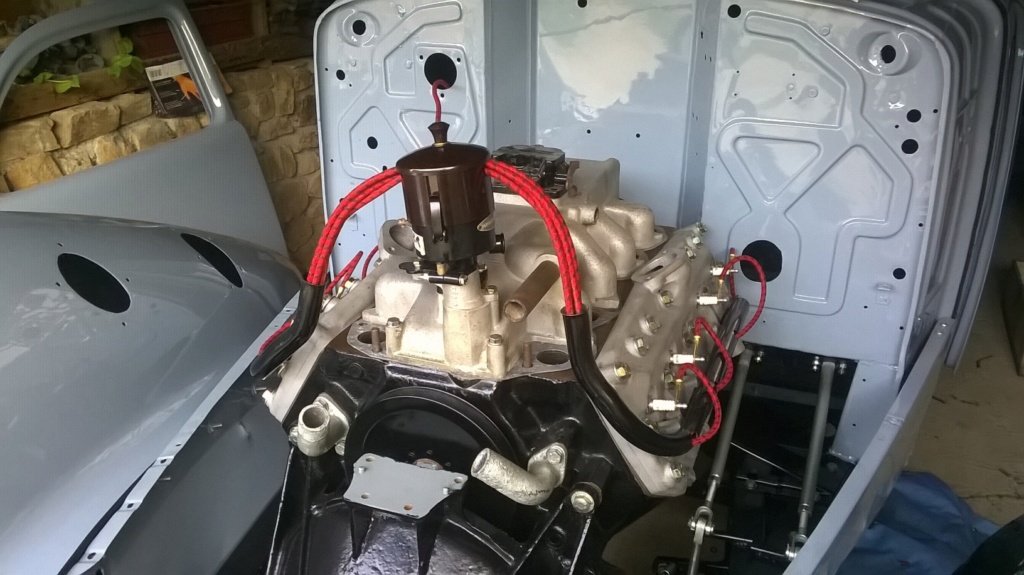
28 Jun 2020 18:05 - 28 Jun 2020 21:50 #40436
by RubyDS
Replied by RubyDS on topic Cord 812 Custom Beverly restoration story
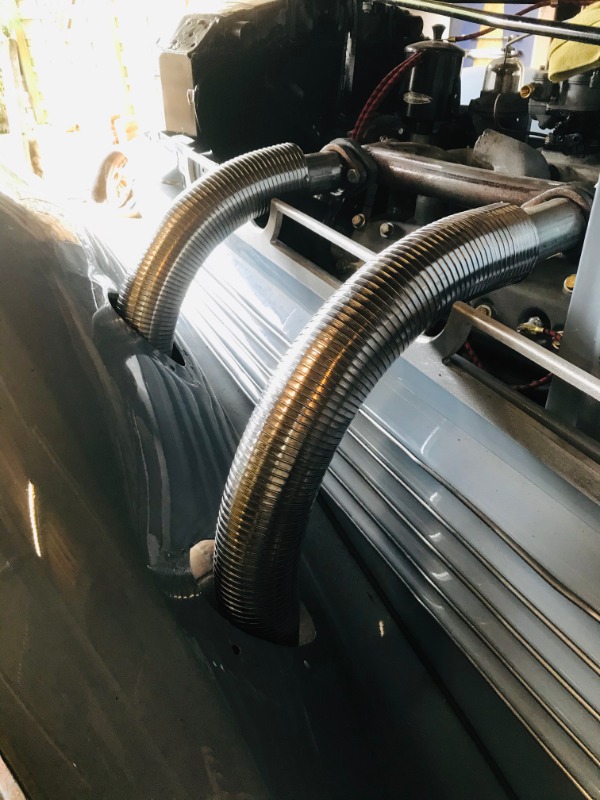
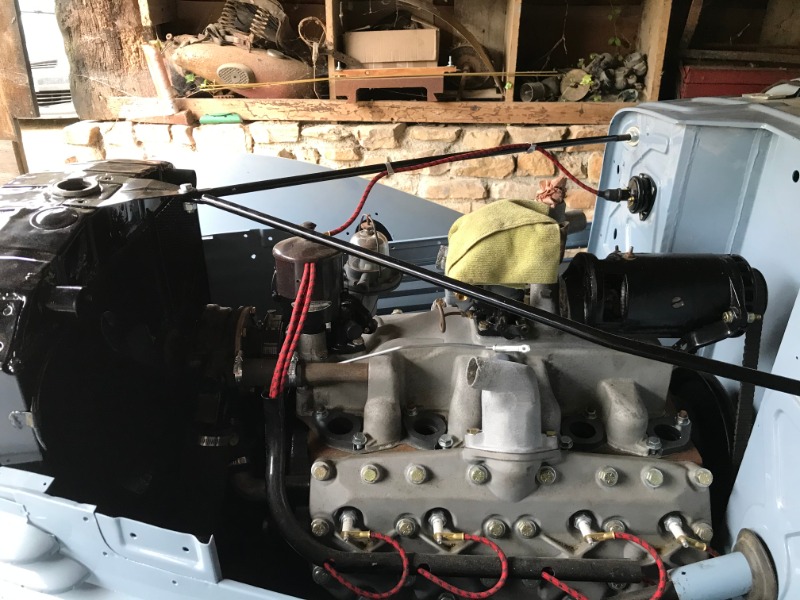
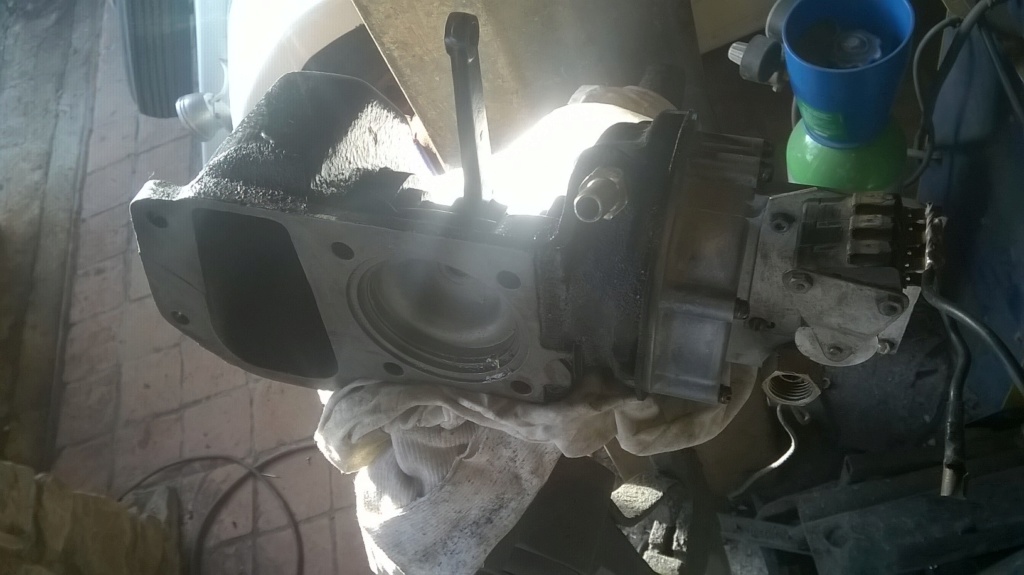
and i make the exhaust manifold

Last edit: 28 Jun 2020 21:50 by RubyDS.
Please Log in or Create an account to join the conversation.
- RubyDS
-
Topic Author
- Offline
- Moderator
-
Registered
Less
More
- Posts: 119
- Thank you received: 10
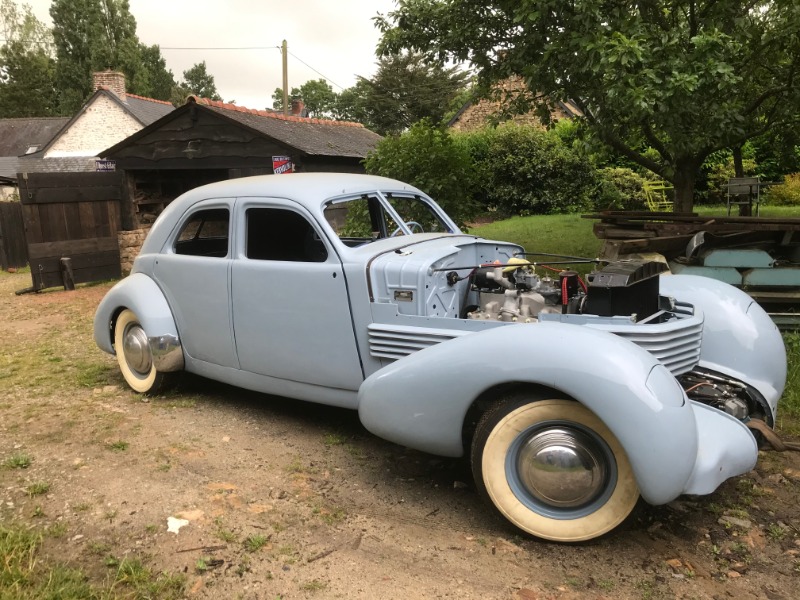
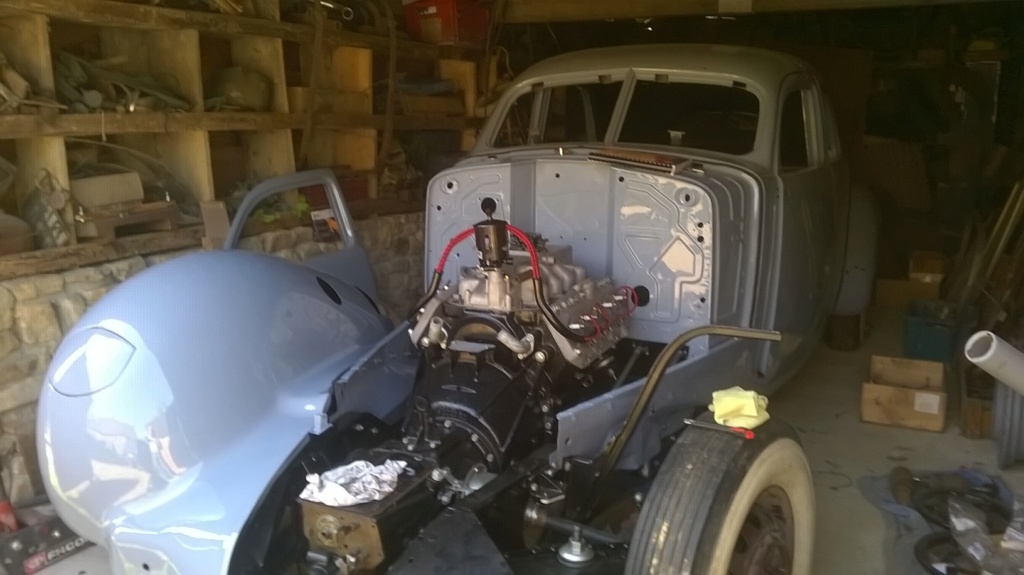
28 Jun 2020 18:01 #40435
by RubyDS
Replied by RubyDS on topic Cord 812 Custom Beverly restoration story
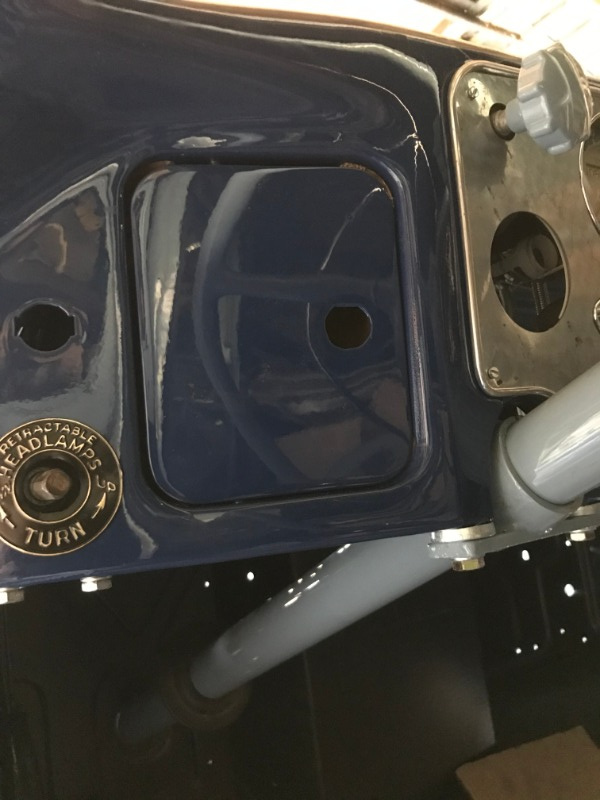
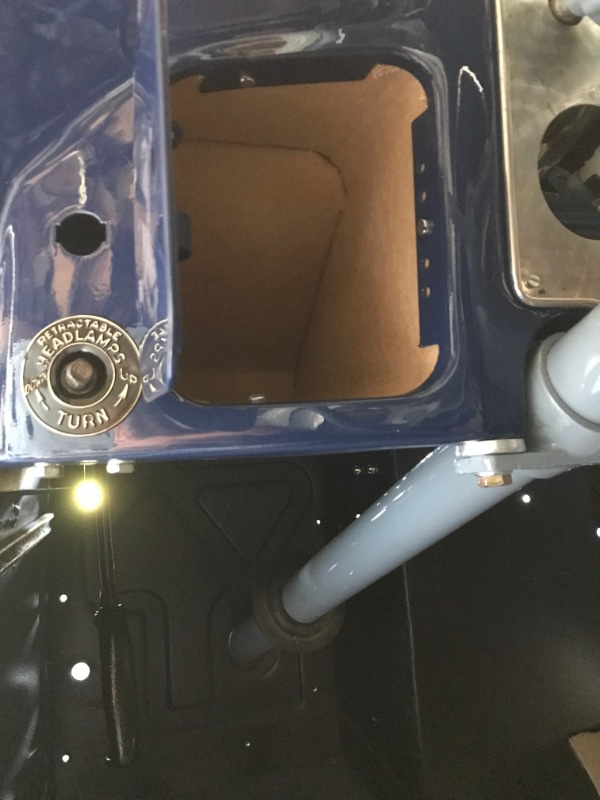
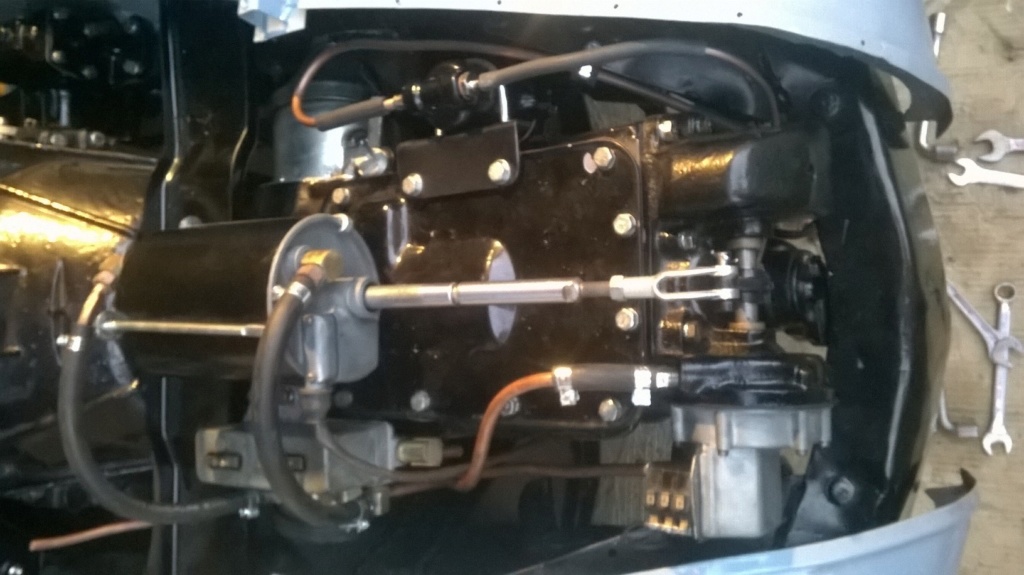
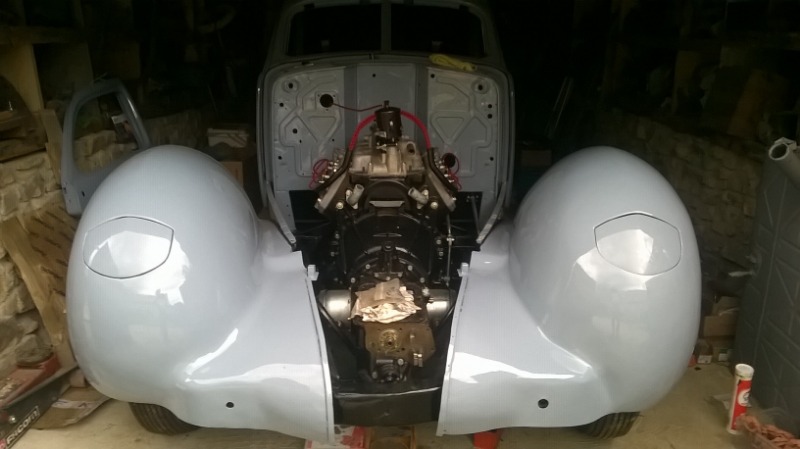
Re assembly continue
Please Log in or Create an account to join the conversation.
- katesmith1304
- Offline
- Non-Member
-
Registered
Less
More
- Posts: 2
- Thank you received: 0
18 Apr 2020 12:40 - 24 Apr 2020 22:15 #39971
by katesmith1304
Replied by katesmith1304 on topic Cord 812 Custom Beverly restoration story
Last edit: 24 Apr 2020 22:15 by katesmith1304.
Please Log in or Create an account to join the conversation.
- RubyDS
-
Topic Author
- Offline
- Moderator
-
Registered
Less
More
- Posts: 119
- Thank you received: 10
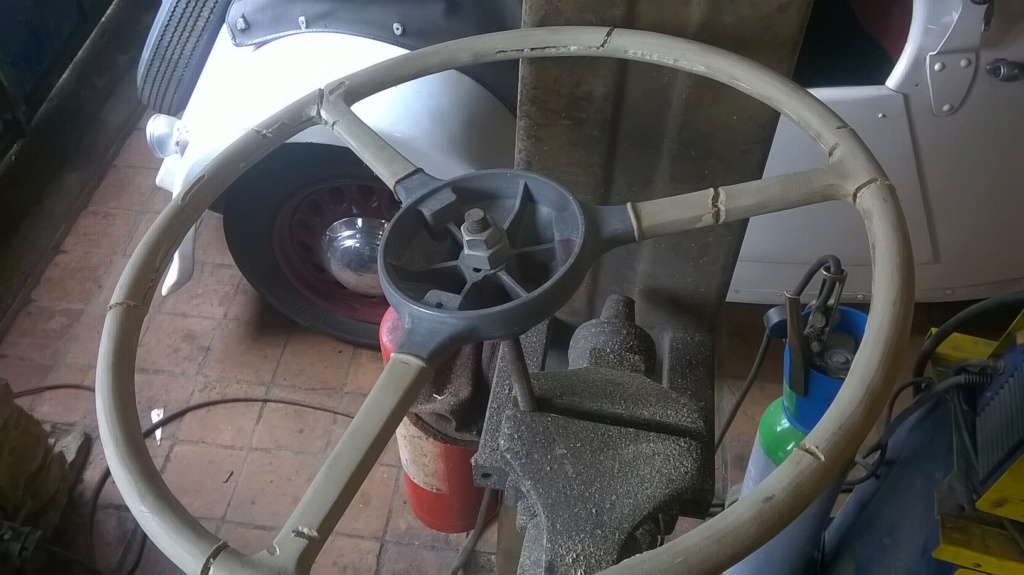
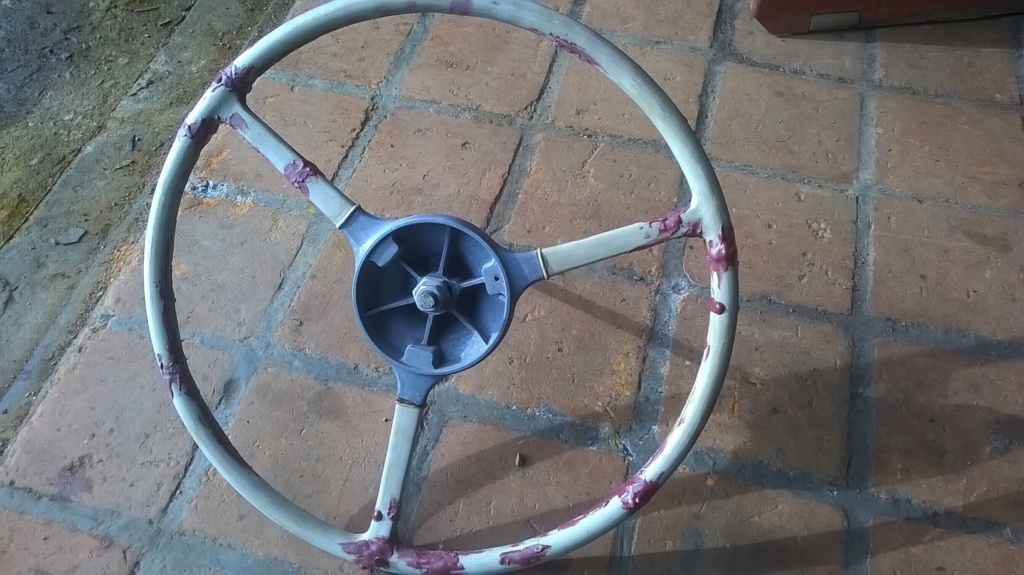
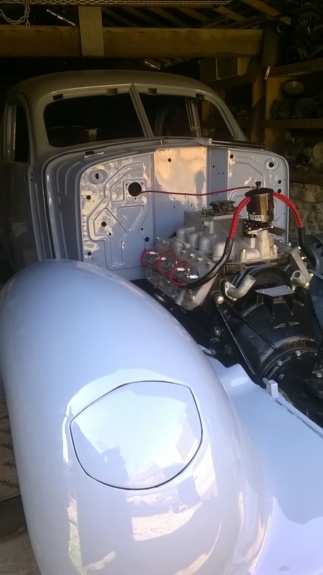
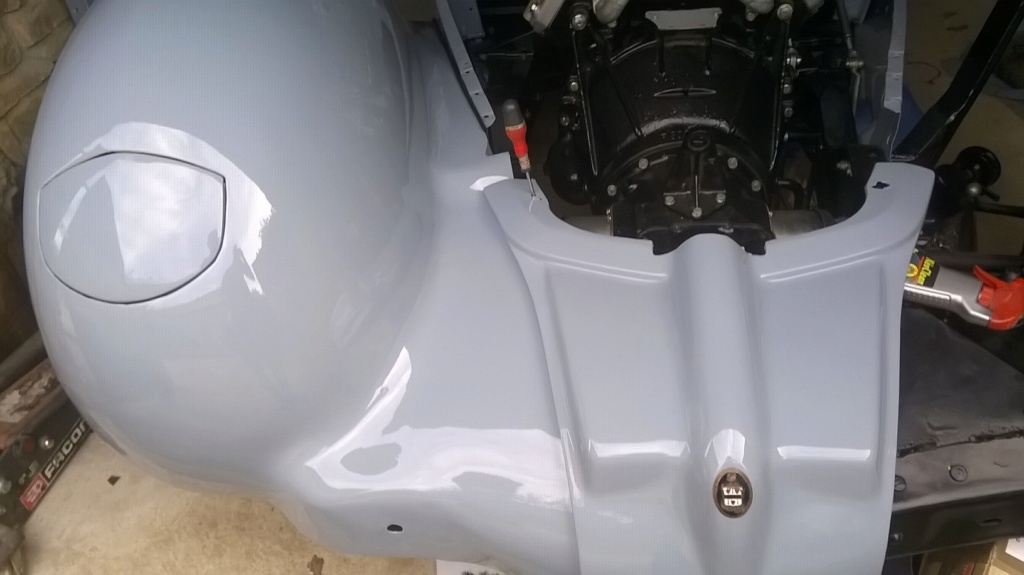
16 Apr 2020 17:54 #39961
by RubyDS
Replied by RubyDS on topic Cord 812 Custom Beverly restoration story
and details

Please Log in or Create an account to join the conversation.
- RubyDS
-
Topic Author
- Offline
- Moderator
-
Registered
Less
More
- Posts: 119
- Thank you received: 10
16 Apr 2020 17:52 #39960
by RubyDS
Replied by RubyDS on topic Cord 812 Custom Beverly restoration story
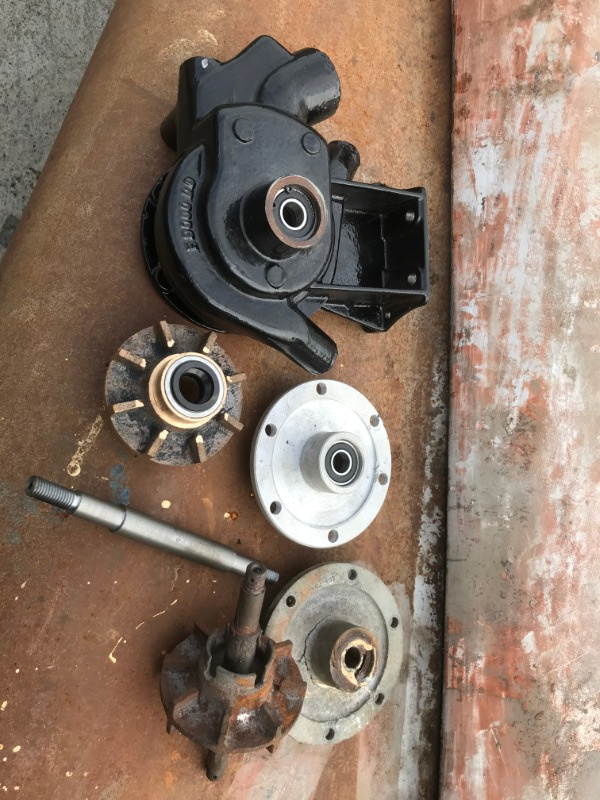
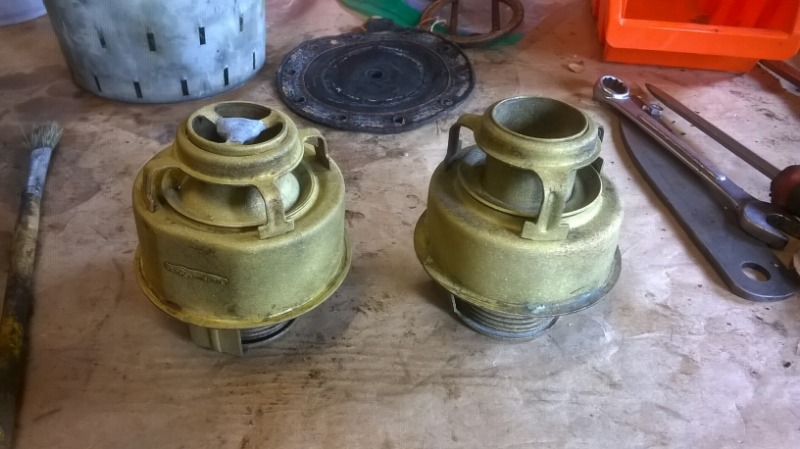
Progress on water pump in bad condition,only the housing is original,rest is all new home made

Please Log in or Create an account to join the conversation.
- JIM.OBRIEN
- Offline
- Premium Forum User
-
Registered
Less
More
- Posts: 586
- Thank you received: 217
19 Mar 2020 12:30 #39762
by JIM.OBRIEN
Replied by JIM.OBRIEN on topic Cord 812 Custom Beverly restoration story
MIke, This is not a problem on the Cord 810/812 since there should be two points that limit the drop of the wheel. There is a bumper on the stub frame that stops the swing arm (and crushes the rubber) and then there is the safety hangers on the springs. If I am going to be running the wheels when up on jack stands I have a set of stands under the trailing arms so they are in the normal position.
The following user(s) said Thank You: 1748 S
Please Log in or Create an account to join the conversation.
- uconn_1965
- Offline
- Moderator
-
Registered
Less
More
- Posts: 369
- Thank you received: 97
19 Mar 2020 12:15 #39761
by uconn_1965
Replied by uconn_1965 on topic Cord 812 Custom Beverly restoration story
Maybe I’m lucky but been doing it this way for 50 years without a problem. I’ve also been fortunate to have used no’s bendix joints.
Please Log in or Create an account to join the conversation.
- mikespeed35
-

- Offline
- ACD Club Life Member
-
Registered
Less
More
- Posts: 885
- Thank you received: 194
19 Mar 2020 04:24 #39758
by mikespeed35
Mike Huffman
Replied by mikespeed35 on topic Cord 812 Custom Beverly restoration story
If you do this with a L-29 you will wreak havoc with the CV joints because of the sharp angle of the joints off the ground. Don't now about the 810/12.
CORDiallyMike
CORDiallyMike
Mike Huffman
Please Log in or Create an account to join the conversation.
- uconn_1965
- Offline
- Moderator
-
Registered
Less
More
- Posts: 369
- Thank you received: 97
18 Mar 2020 13:54 #39752
by uconn_1965
Replied by uconn_1965 on topic Cord 812 Custom Beverly restoration story
I should have added to my original comment you do all the sorting out with the stub frame up on jack stands with front wheels off the ground.
The following user(s) said Thank You: 1748 S
Please Log in or Create an account to join the conversation.
- Terry Cockerell
-

- Offline
- Elite Forum User
-
Registered
Less
More
- Posts: 1338
- Thank you received: 302
18 Mar 2020 07:32 - 18 Mar 2020 07:38 #39749
by Terry Cockerell
T cockerell
Replied by Terry Cockerell on topic Cord 812 Custom Beverly restoration story
Good point Mike. Working around the front fenders on a Cord is very tedious.
Leaving them off until the drive train is sorted out is a good idea.
Some rudimentarey front fenders could be made from tin and fitted during trials.
I think the last item to be fitted should be the hood. Access to the hood bolt holes means leaving the drain pans off as well as the glove boxes and probable removing the front seat. Planning the work will save a lot of hassles.
My understanding of fitting the hood is to lift it onto the body, align it and fit the bolts from under the dash board.
The attached picture shows the provision for accessing the bolts.
T cockerell
Last edit: 18 Mar 2020 07:38 by Terry Cockerell. Reason: Spelling error.
Please Log in or Create an account to join the conversation.
- mikespeed35
-
- Offline
- ACD Club Life Member
-
Registered
Less
More
- Posts: 885
- Thank you received: 194
18 Mar 2020 04:52 #39746
by mikespeed35
Mike Huffman
Replied by mikespeed35 on topic Cord 812 Custom Beverly restoration story
The down side is if you drive a car around with no front fenders be prepared to repair the stone chips you will get on the rear fenders.
CORDiallyMike
CORDiallyMike
Mike Huffman
Please Log in or Create an account to join the conversation.
- uconn_1965
- Offline
- Moderator
-
Registered
Less
More
- Posts: 369
- Thank you received: 97
17 Mar 2020 22:08 #39742
by uconn_1965
Replied by uconn_1965 on topic Cord 812 Custom Beverly restoration story
Great, great job and what I’m about to say is too late. I’ve always found it was best to leave front fenders, grille and hood off of car until the Cord is running, shifting and all mechanical issues are sorted out.
Please Log in or Create an account to join the conversation.
- RubyDS
-
Topic Author
- Offline
- Moderator
-
Registered
Less
More
- Posts: 119
- Thank you received: 10
17 Mar 2020 20:52 #39741
by RubyDS
Replied by RubyDS on topic Cord 812 Custom Beverly restoration story
Please Log in or Create an account to join the conversation.
- Terry Cockerell
-
- Offline
- Elite Forum User
-
Registered
Less
More
- Posts: 1338
- Thank you received: 302
23 Nov 2019 21:47 #38894
by Terry Cockerell
T cockerell
Replied by Terry Cockerell on topic Cord 812 Custom Beverly restoration story
Hi Rudy looking at the pictures of the steering box I noted that the spring on the steering column is above the collar. The spring should be between the steering box and the collar to keep the seal under slight pressure.
You may have already rectified this?
You have done an amazing job restoring the wreck you started with.
I take my hat off to you.
You may have already rectified this?
You have done an amazing job restoring the wreck you started with.
I take my hat off to you.
T cockerell
The following user(s) said Thank You: 1748 S
Please Log in or Create an account to join the conversation.
- RubyDS
-
Topic Author
- Offline
- Moderator
-
Registered
Less
More
- Posts: 119
- Thank you received: 10
19 Nov 2019 15:25 #38876
by RubyDS
Replied by RubyDS on topic Cord 812 Custom Beverly restoration story
Thanks Gary
Please Log in or Create an account to join the conversation.
- 1748 S
- Offline
- Platinum Forum User
-
Registered
Less
More
- Posts: 1745
- Thank you received: 134
12 Nov 2019 02:14 #38832
by 1748 S
Replied by 1748 S on topic Cord 812 Custom Beverly restoration story
Your making very good progress.Your car is looking fabulous. The attention to detail is wonderful.
Gary Parsons
Gary Parsons
Please Log in or Create an account to join the conversation.
- RubyDS
-
Topic Author
- Offline
- Moderator
-
Registered
Less
More
- Posts: 119
- Thank you received: 10
11 Nov 2019 19:48 #38831
by RubyDS
Replied by RubyDS on topic Cord 812 Custom Beverly restoration story
The following user(s) said Thank You: Jonathan Richards
Please Log in or Create an account to join the conversation.
- RubyDS
-
Topic Author
- Offline
- Moderator
-
Registered
Less
More
- Posts: 119
- Thank you received: 10
11 Nov 2019 19:48 #38830
by RubyDS
Replied by RubyDS on topic Cord 812 Custom Beverly restoration story
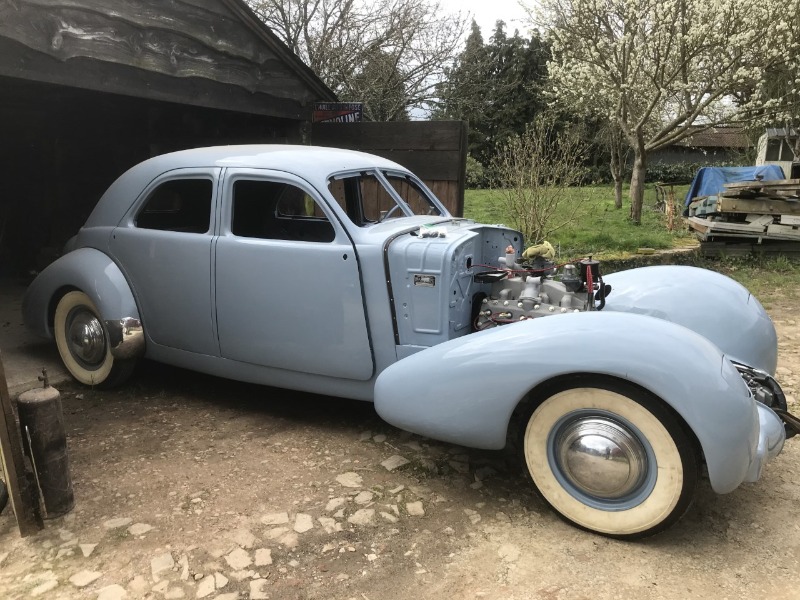
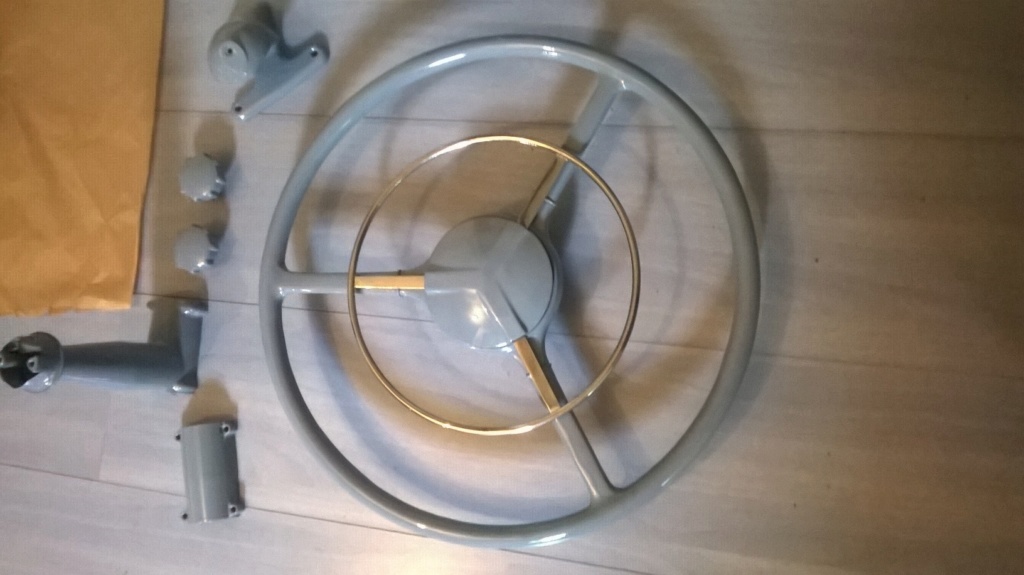
More progress
The following user(s) said Thank You: Jonathan Richards
Please Log in or Create an account to join the conversation.
- RubyDS
-
Topic Author
- Offline
- Moderator
-
Registered
Less
More
- Posts: 119
- Thank you received: 10
01 Nov 2019 20:02 #38765
by RubyDS

Replied by RubyDS on topic Cord 812 Custom Beverly restoration story
The following user(s) said Thank You: Jonathan Richards
Please Log in or Create an account to join the conversation.
- RubyDS
-
Topic Author
- Offline
- Moderator
-
Registered
Less
More
- Posts: 119
- Thank you received: 10
01 Nov 2019 19:56 - 01 Nov 2019 19:59 #38764
by RubyDS
Replied by RubyDS on topic Cord 812 Custom Beverly restoration story
Last edit: 01 Nov 2019 19:59 by RubyDS.
The following user(s) said Thank You: Jonathan Richards
Please Log in or Create an account to join the conversation.
- 1748 S
- Offline
- Platinum Forum User
-
Registered
Less
More
- Posts: 1745
- Thank you received: 134
29 Jun 2019 14:58 #37621
by 1748 S
Gary Parsons
Replied by 1748 S on topic Cord 812 Custom Beverly restoration story
I completely agree with Cliff. After listening to others at the West Coast Meet this month about the use of the 153 degree or 160 degree thermostats its the better idea. I had planned to remove mine but that will not allow the coolant to the coolant to stay in the radiator long enough for proper heat transfer.uconn_1965 wrote: If those are 153 or 160 degree thermostats, those are the very best ones to use.
Gary Parsons
Please Log in or Create an account to join the conversation.
- uconn_1965
- Offline
- Moderator
-
Registered
Less
More
- Posts: 369
- Thank you received: 97
29 Jun 2019 13:46 #37620
by uconn_1965
Replied by uconn_1965 on topic Cord 812 Custom Beverly restoration story
If those are 153 or 160 degree thermostats, those are the very best ones to use.
The following user(s) said Thank You: 1748 S
Please Log in or Create an account to join the conversation.
- RubyDS
-
Topic Author
- Offline
- Moderator
-
Registered
Less
More
- Posts: 119
- Thank you received: 10
29 Jun 2019 11:47 #37619
by RubyDS
Replied by RubyDS on topic Cord 812 Custom Beverly restoration story
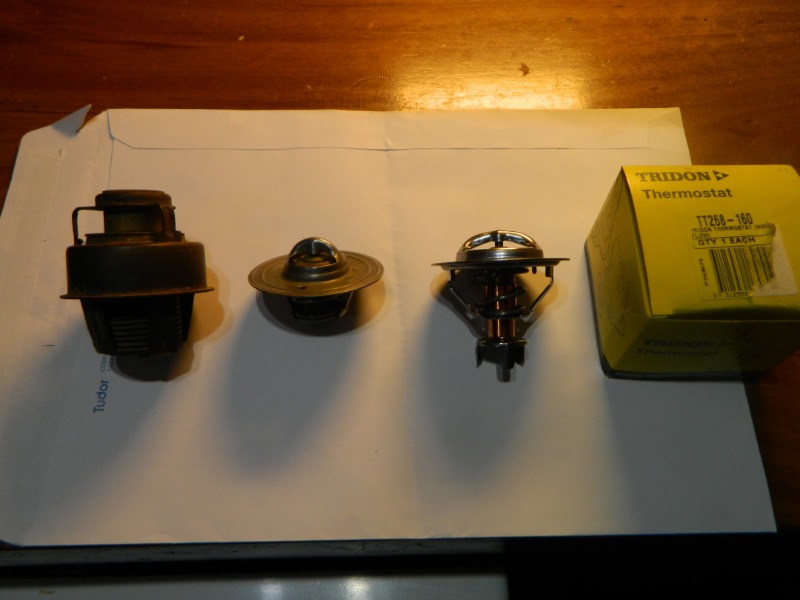
After checking it's not two thermostat 185° but some 153° model
Good news")
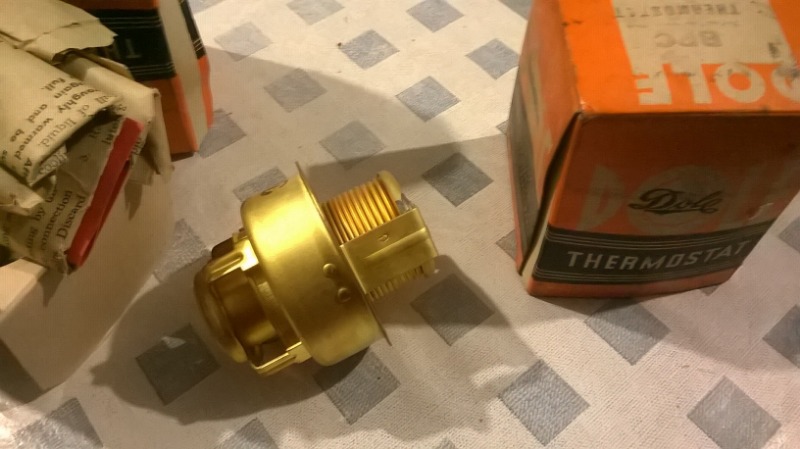
Good news
Please Log in or Create an account to join the conversation.
- johnmereness
- Offline
- Moderator
-
Registered
Less
More
- Posts: 767
- Thank you received: 159
19 Jun 2019 21:35 - 19 Jun 2019 21:38 #37545
by johnmereness
From John Mereness: This appears solid advice, though I would have at least one hole drilled in the thermostat as that will eliminate air pockets and equally cause a slightly less dramatic "heat up" of the engine. I think we are all on the same page here, though just a double check. If you have a 185 thermostat in your car when you start the car the thermostat technically should be closed and open at 185 to more or less pre-heat the engine (great in winter to keep your feet warm), If you car though is naturally inclined to run at 165 on a cool day it will heat it to 185. And, on a hot day it will cause it to heat to 185 minimum too - but if your car is prone to running at 190 then car will run at 190 and if prone to 195 then your car will run at 195 and so on. Personally, I prefer the car to heat to 165 and then do whatever it is prone to do on its own after that without my extra help. Keep in mind too that water that moves too quickly through a radiator may not cool properly - thus thermostats are often also flow restictors to allow water to remain in radiator for a certain amount of time (ie when people remove thermostats they often encounter worse overheating that what they originally hoped to resolve).
JMM
Replied by johnmereness on topic Cord 812 Custom Beverly restoration story
Terry Cockerell wrote: When my Cord arrived in Australia in 2007 it did not have thermostats fitted. The car was not driveable and needed a lot of work.
I opted to stop the coolant flow through the inlet manifold and used modern thermostats that opened at 160 deg F
I needed to drill a bleed hole in them and actually drilled two in each as the thermostat throats were smaller than the original type. This worked quite well in the car in conjunction with a shroud.
Recently I found a better design of thermostat with a much bigger throat, these are called full flow design. These were not available in the size I wanted in the past. They have a built in bleed hole and due to the larger throat diameter should work a lot better. I will find out later in the year when the car is back on the road.
The new full flow thermostat is made by Tridon in Australia Part No TT268 - 160
The cost is $41.oo Aust each.

From John Mereness: This appears solid advice, though I would have at least one hole drilled in the thermostat as that will eliminate air pockets and equally cause a slightly less dramatic "heat up" of the engine. I think we are all on the same page here, though just a double check. If you have a 185 thermostat in your car when you start the car the thermostat technically should be closed and open at 185 to more or less pre-heat the engine (great in winter to keep your feet warm), If you car though is naturally inclined to run at 165 on a cool day it will heat it to 185. And, on a hot day it will cause it to heat to 185 minimum too - but if your car is prone to running at 190 then car will run at 190 and if prone to 195 then your car will run at 195 and so on. Personally, I prefer the car to heat to 165 and then do whatever it is prone to do on its own after that without my extra help. Keep in mind too that water that moves too quickly through a radiator may not cool properly - thus thermostats are often also flow restictors to allow water to remain in radiator for a certain amount of time (ie when people remove thermostats they often encounter worse overheating that what they originally hoped to resolve).
JMM
Last edit: 19 Jun 2019 21:38 by johnmereness.
The following user(s) said Thank You: Jonathan Richards, 1748 S
Please Log in or Create an account to join the conversation.
- Terry Cockerell
-
- Offline
- Elite Forum User
-
Registered
Less
More
- Posts: 1338
- Thank you received: 302
19 Jun 2019 20:50 #37543
by Terry Cockerell
T cockerell
Replied by Terry Cockerell on topic Cord 812 Custom Beverly restoration story
Rudy from my experience 185 deg F is too high. It does not leave you much of a safety margin in hot weather or slow driving in heavy traffic. The thermostats I have used begin to open at 160 deg F.
T cockerell
Please Log in or Create an account to join the conversation.
- RubyDS
-
Topic Author
- Offline
- Moderator
-
Registered
Less
More
- Posts: 119
- Thank you received: 10
19 Jun 2019 20:13 #37542
by RubyDS
Replied by RubyDS on topic Cord 812 Custom Beverly restoration story
I have just reiceipt two new old stock thermostat 185°

Please Log in or Create an account to join the conversation.
- Terry Cockerell
-
- Offline
- Elite Forum User
-
Registered
Less
More
- Posts: 1338
- Thank you received: 302
19 Jun 2019 10:30 - 19 Jun 2019 10:32 #37538
by Terry Cockerell
T cockerell
Replied by Terry Cockerell on topic Cord 812 Custom Beverly restoration story
When my Cord arrived in Australia in 2007 it did not have thermostats fitted. The car was not driveable and needed a lot of work.
I opted to stop the coolant flow through the inlet manifold and used modern thermostats that opened at 160 deg F
I needed to drill a bleed hole in them and actually drilled two in each as the thermostat throats were smaller than the original type. This worked quite well in the car in conjunction with a shroud.
Recently I found a better design of thermostat with a much bigger throat, these are called full flow design. These were not available in the size I wanted in the past. They have a built in bleed hole and due to the larger throat diameter should work a lot better. I will find out later in the year when the car is back on the road.
The new full flow thermostat is made by Tridon in Australia Part No TT268 - 160
The cost is $41.oo Aust each.
T cockerell
Last edit: 19 Jun 2019 10:32 by Terry Cockerell. Reason: Adding pictures
Please Log in or Create an account to join the conversation.
- mikespeed35
-
- Offline
- ACD Club Life Member
-
Registered
Less
More
- Posts: 885
- Thank you received: 194
19 Jun 2019 02:20 #37534
by mikespeed35
Mike Huffman
Replied by mikespeed35 on topic Cord 812 Custom Beverly restoration story
Right Ruby, This is just for summer and it depends on the climate of the user of course.
CORDiallyMike
CORDiallyMike
Mike Huffman
Please Log in or Create an account to join the conversation.
- RubyDS
-
Topic Author
- Offline
- Moderator
-
Registered
Less
More
- Posts: 119
- Thank you received: 10
18 Jun 2019 16:16 #37529
by RubyDS
Replied by RubyDS on topic Cord 812 Custom Beverly restoration story
Only water is not a good idea for winter ,a few years ago i have crack an engine in winter with water
Please Log in or Create an account to join the conversation.
- mikespeed35
-
- Offline
- ACD Club Life Member
-
Registered
Less
More
- Posts: 885
- Thank you received: 194
16 Jun 2019 04:04 #37476
by mikespeed35
Mike Huffman
Replied by mikespeed35 on topic Cord 812 Custom Beverly restoration story
160 stat with water and corrosion inhibitor.
CORDiallyMike
CORDiallyMike
Mike Huffman
Please Log in or Create an account to join the conversation.
- johnmereness
- Offline
- Moderator
-
Registered
Less
More
- Posts: 767
- Thank you received: 159
15 Jun 2019 17:35 - 15 Jun 2019 17:38 #37466
by johnmereness
JMM
Replied by johnmereness on topic Cord 812 Custom Beverly restoration story
I would adapt in a modern thermostat(s) - something 180 degrees or cooler. I would drill a hole in the thermostat (near edge of thermostat housing verse in thermostat door) to allow some water circulation when thermostat is closed - this also eliminates air pockets (something old timers told me to always do). The purpose of the cooler thermostat is to eliminate the car heating up so quickly (but to answer Curt's question the car will run at whatever it is going to - depends on how close to original bore is, quality of engine rebuild, radiator quality, timing/tuning, and ...). Thermostats also are used as flow restrictors - the water has to remain in the radiator for a certain period of time for it to cool - water moving through radiator too quickly will not cool properly (thus when you remove a thermostat you may actually have a hotter running car).
JMM
Last edit: 15 Jun 2019 17:38 by johnmereness.
The following user(s) said Thank You: 1748 S
Please Log in or Create an account to join the conversation.
- Curt Schulze
-
- Offline
- Moderator
-
Registered
Less
More
- Posts: 1013
- Thank you received: 140
02 Jun 2019 16:35 #37364
by Curt Schulze
The bitterness of poor quality remains long after the sweetness of low price is forgotten.
Be of Good Cheer
Curt
Replied by Curt Schulze on topic Cord 812 Custom Beverly restoration story
Do you think the engine will run cooler with a 160 or a 153 thermostat ?
The bitterness of poor quality remains long after the sweetness of low price is forgotten.
Be of Good Cheer
Curt
Please Log in or Create an account to join the conversation.
- uconn_1965
- Offline
- Moderator
-
Registered
Less
More
- Posts: 369
- Thank you received: 97
02 Jun 2019 16:08 #37363
by uconn_1965
Replied by uconn_1965 on topic Cord 812 Custom Beverly restoration story
Cord will run hotter with out thermostats. Best to use low temperture thermostats even if they are not matched (example 153 degree and 160 degree.
Please Log in or Create an account to join the conversation.
- RubyDS
-
Topic Author
- Offline
- Moderator
-
Registered
Less
More
- Posts: 119
- Thank you received: 10
02 Jun 2019 13:46 #37362
by RubyDS
Replied by RubyDS on topic Cord 812 Custom Beverly restoration story
My two thermostat are not similar and not opening to same temperature ,what model use for 812 engine? 153° temperature?
Or best cooling without thermostat?
Tanks
Or best cooling without thermostat?
Tanks
Please Log in or Create an account to join the conversation.
- RubyDS
-
Topic Author
- Offline
- Moderator
-
Registered
Less
More
- Posts: 119
- Thank you received: 10
02 May 2019 19:59 #37126
by RubyDS
Replied by RubyDS on topic Cord 812 Custom Beverly restoration story
Please Log in or Create an account to join the conversation.
- RubyDS
-
Topic Author
- Offline
- Moderator
-
Registered
Less
More
- Posts: 119
- Thank you received: 10
22 Apr 2019 11:56 #37041
by RubyDS
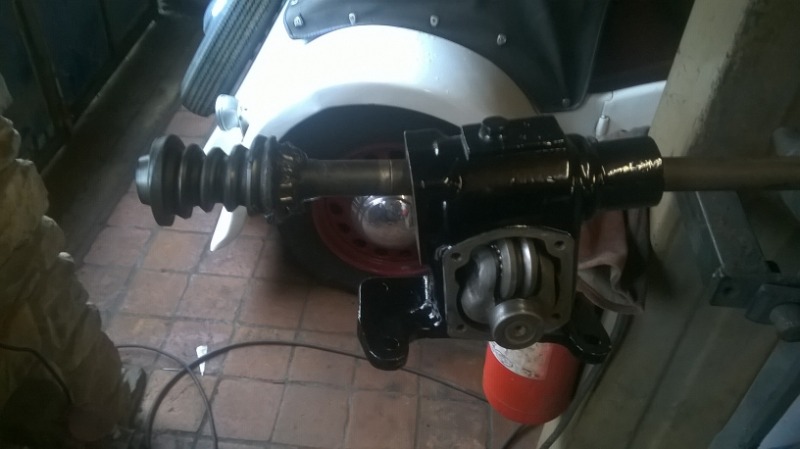
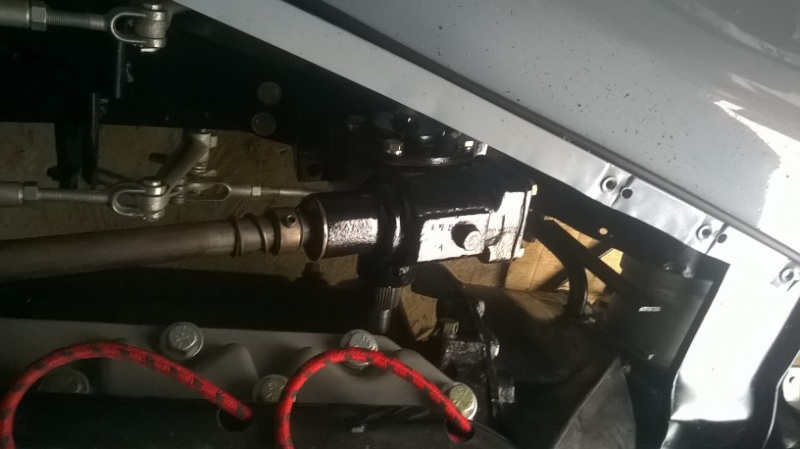
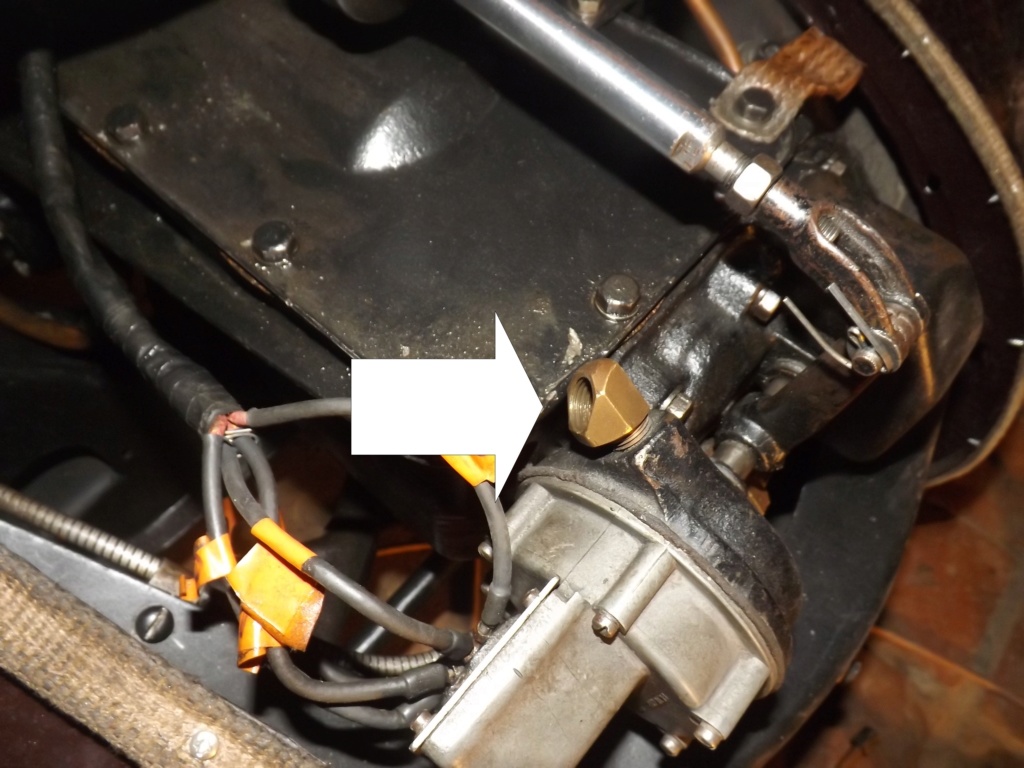
Hi Jim,thanks for this response,have you an adress for the fittings to make my gearbox controls lines.
Replied by RubyDS on topic Cord 812 Custom Beverly restoration story
JIM.OBRIEN wrote: Hi Ruby,
You are coming along nicely. One comment - the inner CV joint cover need to be rotated. The fill fitting on the left joint should be at the top, just forward of the center line. The cover on the right joint should be just rear of the top center.
The lines for the cross shift are copper lines, you just need the furrels.
All the fittings you are looking for are all readily available from any good supplier supplier, either locally or on line. If you need help let me know.
Jim
Hi Jim,thanks for this response,have you an adress for the fittings to make my gearbox controls lines.
Please Log in or Create an account to join the conversation.
- RubyDS
-
Topic Author
- Offline
- Moderator
-
Registered
Less
More
- Posts: 119
- Thank you received: 10
22 Apr 2019 11:52 #37040
by RubyDS
Hello Terry,
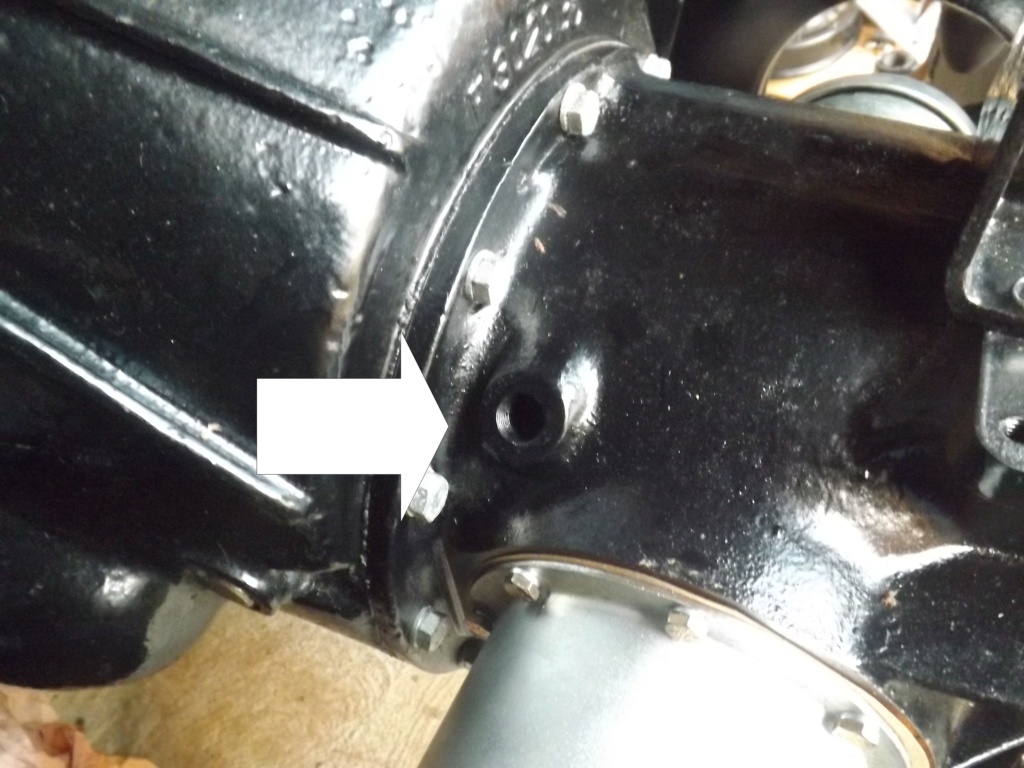
The nut on the front chassis member is not on my car but on a cutomer 810 ,no reason to have this bolt.
Replied by RubyDS on topic Cord 812 Custom Beverly restoration story
Terry Cockerell wrote: Hi Ruby you certainly have come a long way since starting the restoration. Your skills and determination are beyond belief ...................... well done.
I have a question for you, "What is the bolt and lock nut in the middle of the front chassis cross member for ?" "This is immediately in front of the gear box oil pump."
Thanks,
Terry Cockerell
Hello Terry,
The nut on the front chassis member is not on my car but on a cutomer 810 ,no reason to have this bolt.
The following user(s) said Thank You: Terry Cockerell
Please Log in or Create an account to join the conversation.
- JIM.OBRIEN
- Offline
- Premium Forum User
-
Registered
Less
More
- Posts: 586
- Thank you received: 217
22 Apr 2019 00:13 #37039
by JIM.OBRIEN
Replied by JIM.OBRIEN on topic Cord 812 Custom Beverly restoration story
Hi Ruby,
You are coming along nicely. One comment - the inner CV joint cover need to be rotated. The fill fitting on the left joint should be at the top, just forward of the center line. The cover on the right joint should be just rear of the top center.
The lines for the cross shift are copper lines, you just need the furrels.
All the fittings you are looking for are all readily available from any good supplier supplier, either locally or on line. If you need help let me know.
Jim
Please Log in or Create an account to join the conversation.
- Terry Cockerell
-
- Offline
- Elite Forum User
-
Registered
Less
More
- Posts: 1338
- Thank you received: 302
21 Apr 2019 22:01 #37038
by Terry Cockerell
T cockerell
Replied by Terry Cockerell on topic Cord 812 Custom Beverly restoration story
Hi Ruby you certainly have come a long way since starting the restoration. Your skills and determination are beyond belief ...................... well done.
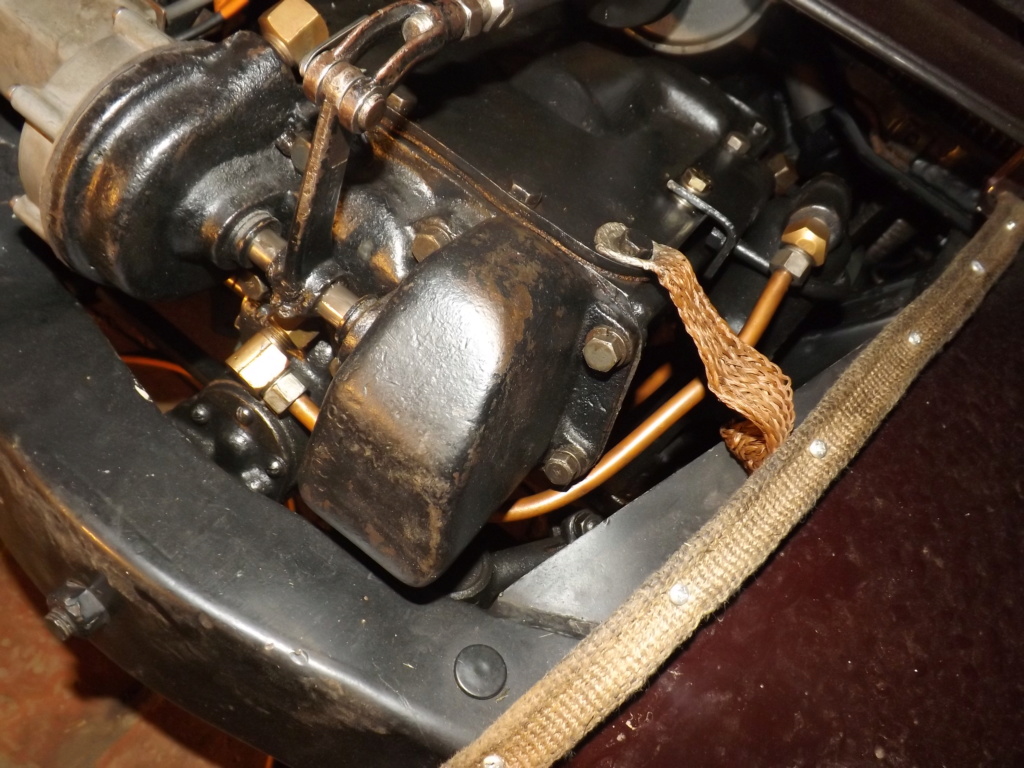
I have a question for you, "What is the bolt and lock nut in the middle of the front chassis cross member for ?" "This is immediately in front of the gear box oil pump."
Thanks,
Terry Cockerell
I have a question for you, "What is the bolt and lock nut in the middle of the front chassis cross member for ?" "This is immediately in front of the gear box oil pump."
Thanks,
Terry Cockerell
T cockerell
Please Log in or Create an account to join the conversation.
- RubyDS
-
Topic Author
- Offline
- Moderator
-
Registered
Less
More
- Posts: 119
- Thank you received: 10
21 Apr 2019 21:23 - 21 Apr 2019 21:25 #37037
by RubyDS
Replied by RubyDS on topic Cord 812 Custom Beverly restoration story
Step by step
Last edit: 21 Apr 2019 21:25 by RubyDS.
Please Log in or Create an account to join the conversation.
- RubyDS
-
Topic Author
- Offline
- Moderator
-
Registered
Less
More
- Posts: 119
- Thank you received: 10
19 Dec 2018 21:05 #36170
by RubyDS
Replied by RubyDS on topic Cord 812 Custom Beverly restoration story
The hose plug on the front
This one
And also the two hose from valve block to intake manifold
If anyone have this parts or only the hose plugs i'm interested
This one
And also the two hose from valve block to intake manifold
If anyone have this parts or only the hose plugs i'm interested
Please Log in or Create an account to join the conversation.
- RubyDS
-
Topic Author
- Offline
- Moderator
-
Registered
Less
More
- Posts: 119
- Thank you received: 10
19 Dec 2018 21:01 #36169
by RubyDS
Replied by RubyDS on topic Cord 812 Custom Beverly restoration story
But for finished my transmission system i have some missing parts
The gearbox vent system
The epurator hose and plugs

The gearbox vent system
The epurator hose and plugs
Please Log in or Create an account to join the conversation.
- RubyDS
-
Topic Author
- Offline
- Moderator
-
Registered
Less
More
- Posts: 119
- Thank you received: 10
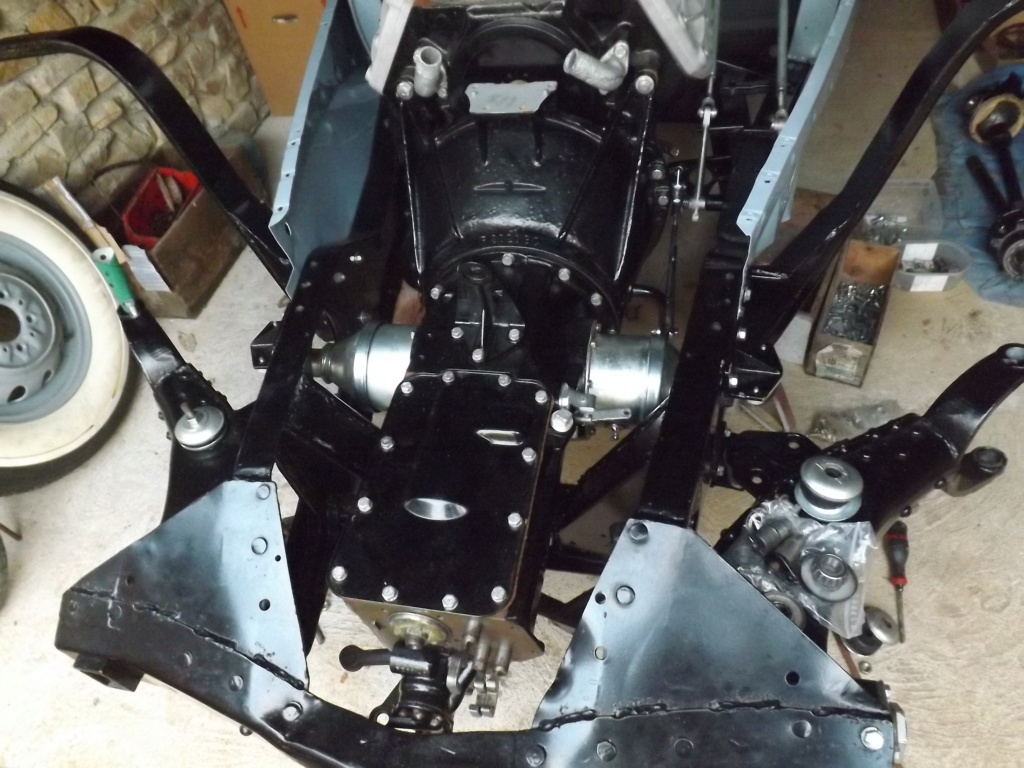
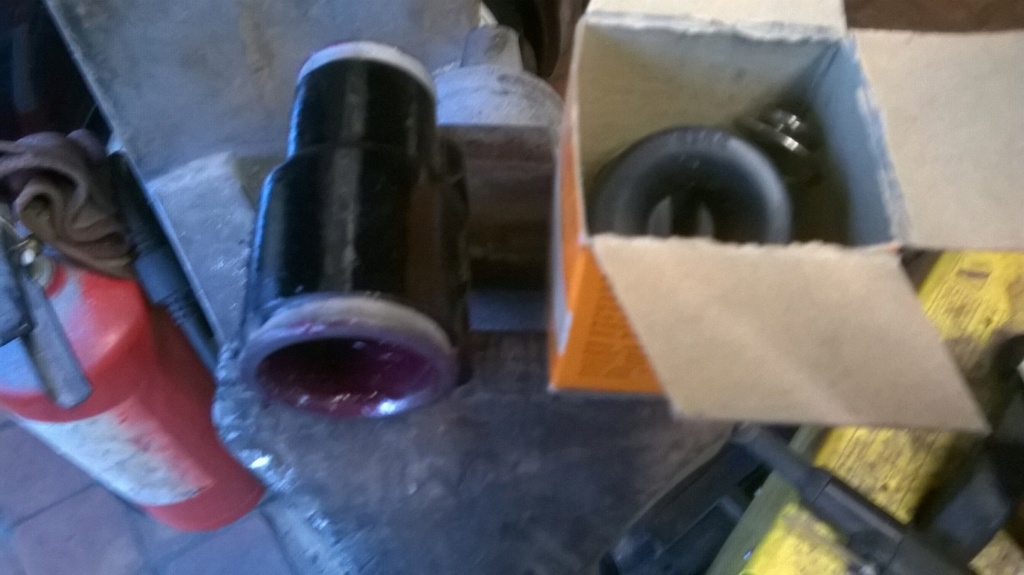
19 Dec 2018 20:55 - 19 Dec 2018 20:57 #36168
by RubyDS
Replied by RubyDS on topic Cord 812 Custom Beverly restoration story
More work on transmisson
Last edit: 19 Dec 2018 20:57 by RubyDS.
Please Log in or Create an account to join the conversation.
- RubyDS
-
Topic Author
- Offline
- Moderator
-
Registered
Less
More
- Posts: 119
- Thank you received: 10
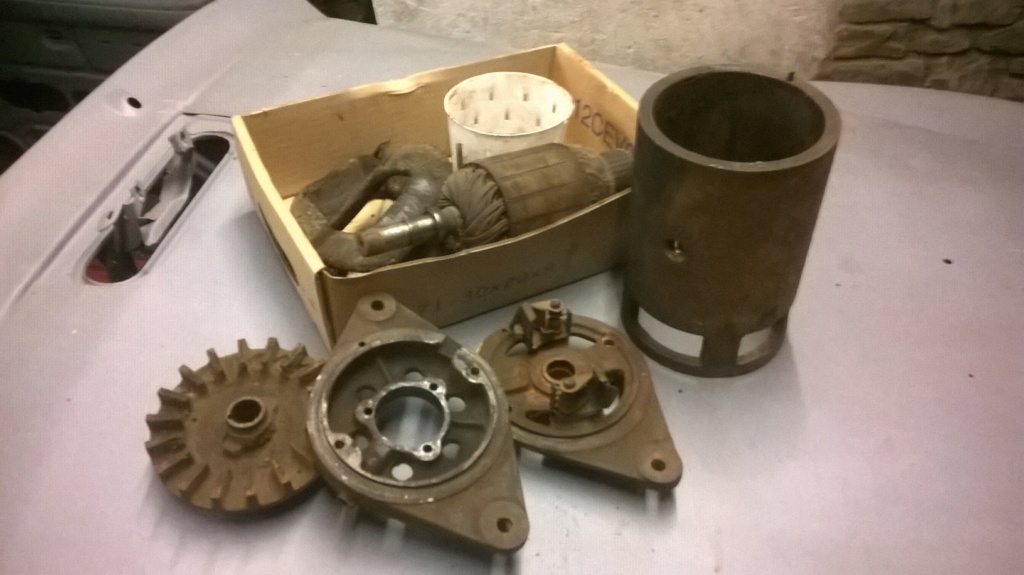
10 Dec 2018 13:48 #36112
by RubyDS
Replied by RubyDS on topic Cord 812 Custom Beverly restoration story
Dynamo and starter motor disassembly
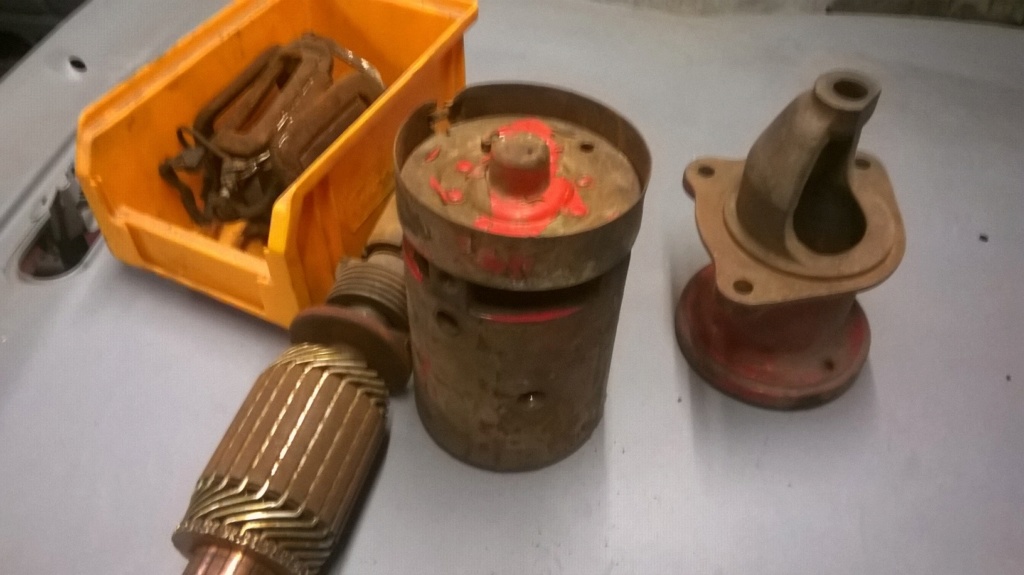
NOS rotor
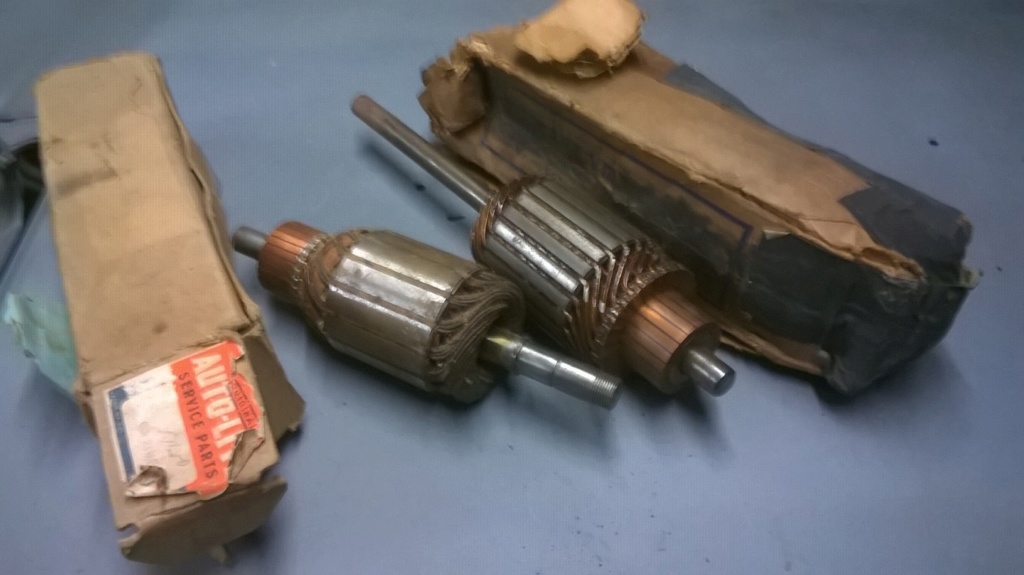
NOS rotor
Please Log in or Create an account to join the conversation.
- RubyDS
-
Topic Author
- Offline
- Moderator
-
Registered
Less
More
- Posts: 119
- Thank you received: 10
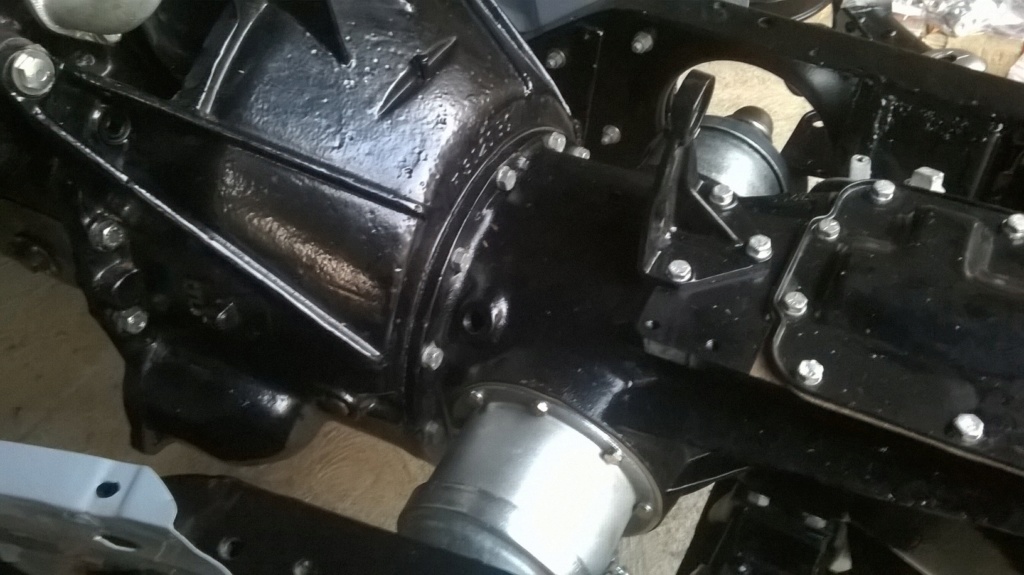
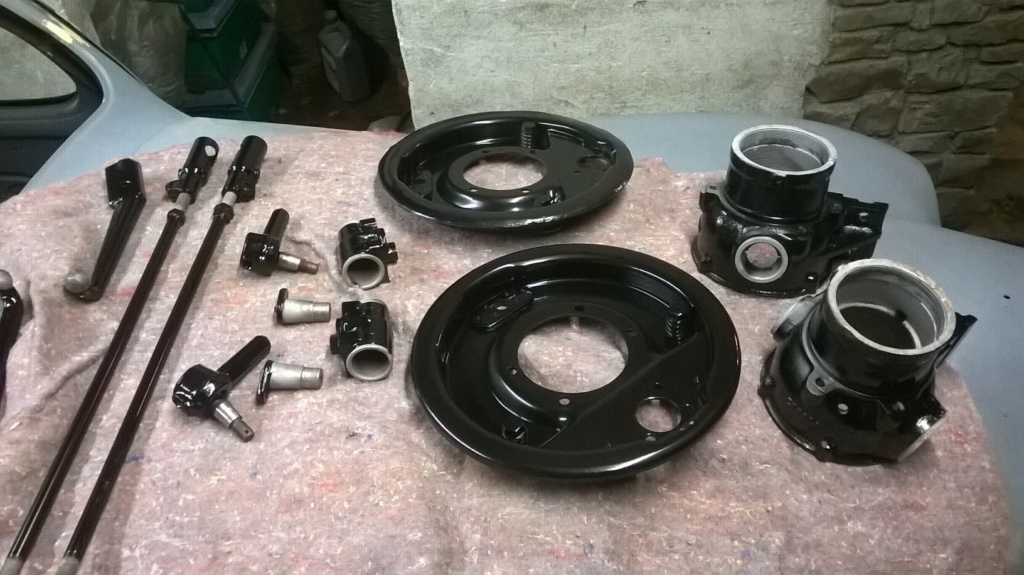
10 Dec 2018 13:47 #36111
by RubyDS
Replied by RubyDS on topic Cord 812 Custom Beverly restoration story
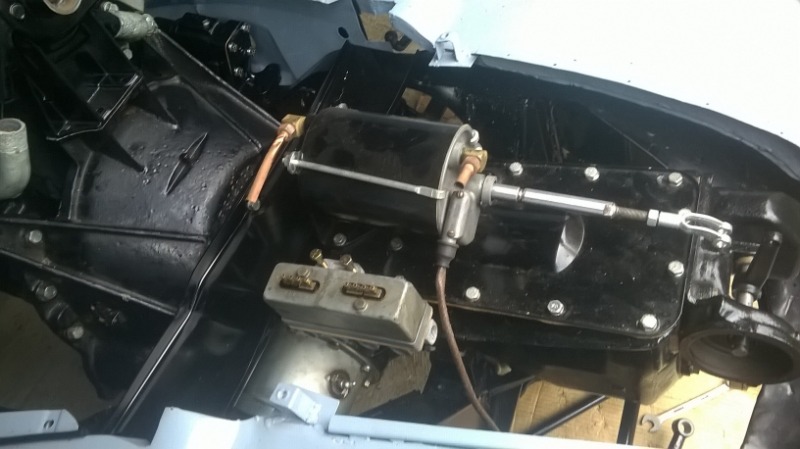
And front transmission
Please Log in or Create an account to join the conversation.
- RubyDS
-
Topic Author
- Offline
- Moderator
-
Registered
Less
More
- Posts: 119
- Thank you received: 10
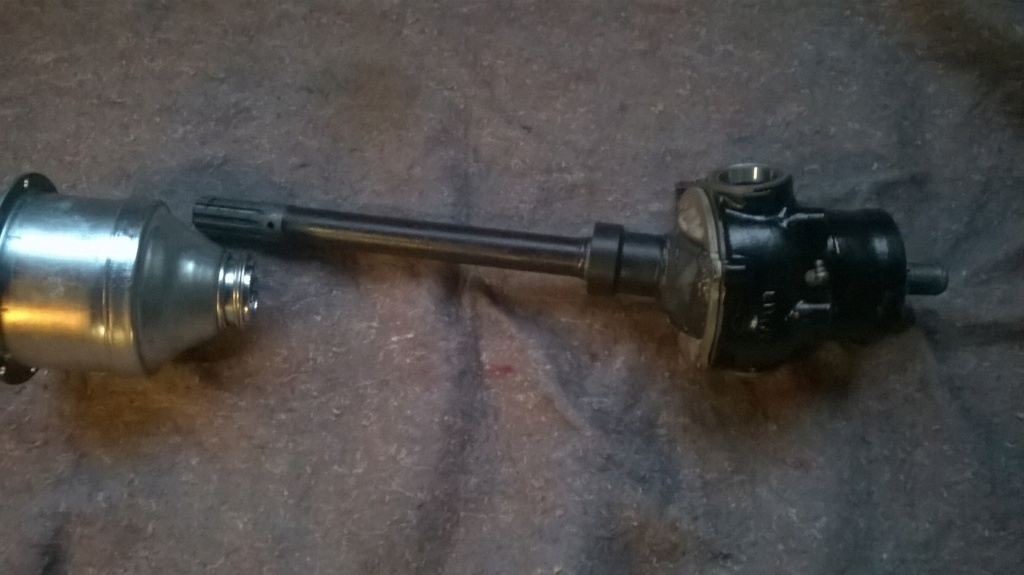
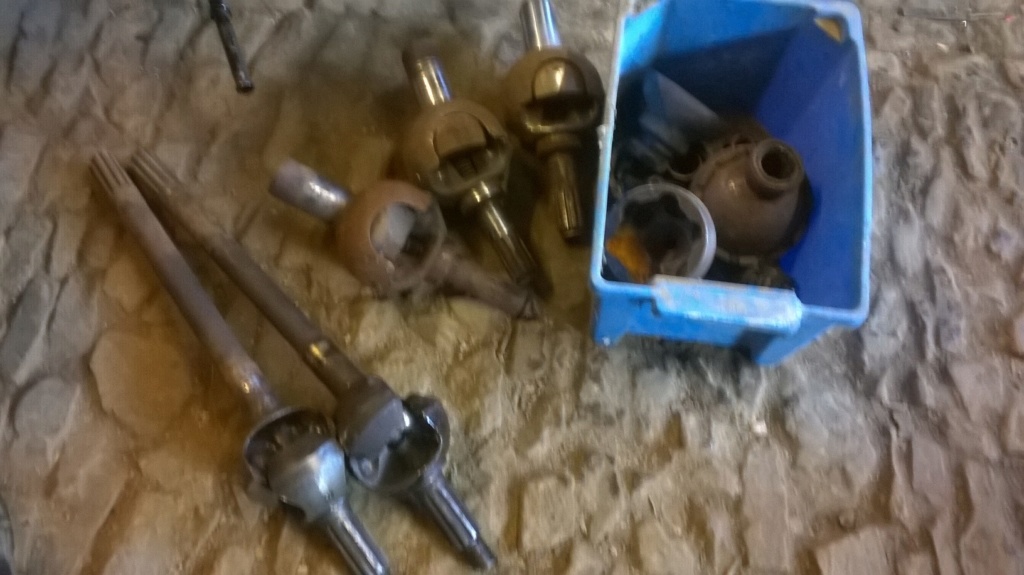
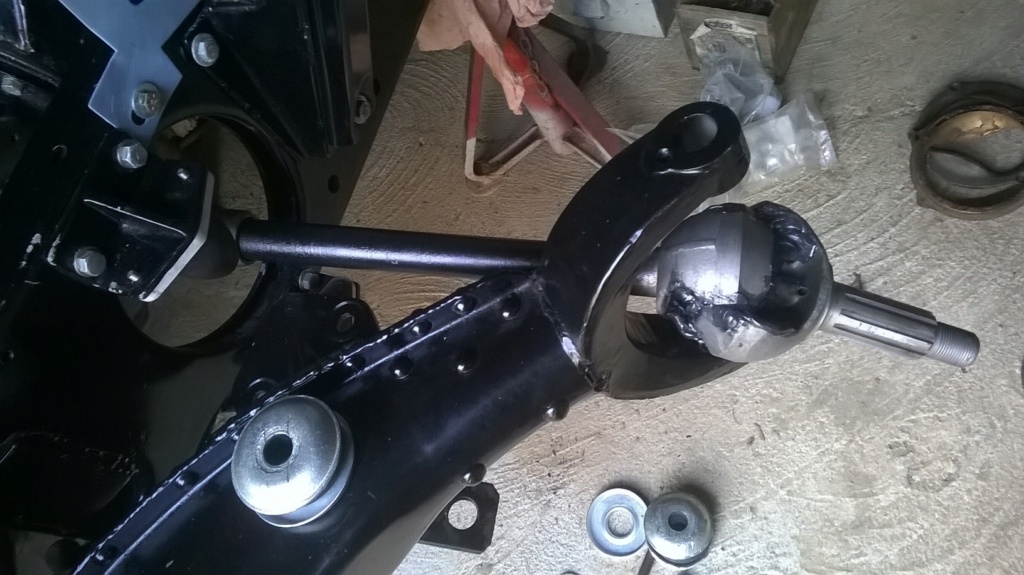
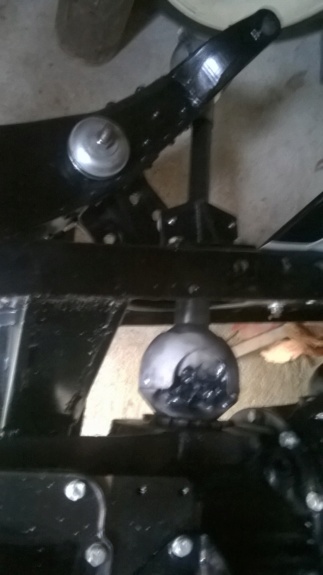
10 Dec 2018 13:46 #36110
by RubyDS
Replied by RubyDS on topic Cord 812 Custom Beverly restoration story
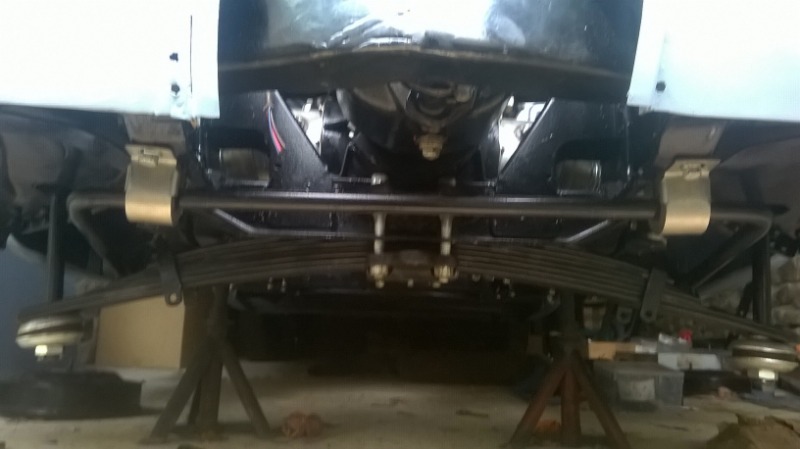
Front axle parts ready to assemly
Please Log in or Create an account to join the conversation.
- 1748 S
- Offline
- Platinum Forum User
-
Registered
Less
More
- Posts: 1745
- Thank you received: 134
26 Sep 2018 23:04 #35521
by 1748 S
Replied by 1748 S on topic Cord 812 Custom Beverly restoration story
Thanks Jim. My car has the spring safety loops. They are bent but easy to copy if I need to. Here are the pics of what my front spring and suspension bolt and nut looked like after it ground down on the road.I also included pics comparing the old to the new.
Gary Parsons
Gary Parsons
Please Log in or Create an account to join the conversation.
- Terry Cockerell
-
- Offline
- Elite Forum User
-
Registered
Less
More
- Posts: 1338
- Thank you received: 302
26 Sep 2018 02:03 - 26 Sep 2018 02:54 #35509
by Terry Cockerell
T cockerell
Replied by Terry Cockerell on topic Cord 812 Custom Beverly restoration story
Regarding the installation of the safety hoops my Cord which is an early production car had the holes drilled through the suspension arms. When the hoops were fitted the sides of the suspension arms were pulled in a bit consequently water could get into the suspension arms . During the current restoration a lot of rust was removed from inside the arms before the holes were drilled out and sleeved with suitable pipe. As well as restore the car I am doing what I can to conserve it.
T cockerell
Last edit: 26 Sep 2018 02:54 by Terry Cockerell. Reason: Adding pictures
Please Log in or Create an account to join the conversation.